Browsing Category

CSS

CSS, Front-end, Front-end Develop

CSS selector reference

May 8, 2018

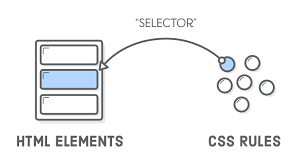
Selectors are not new to CSS3. It already exists from CSS1, and is an extremely important part of CSS. Initially, CSS1 only included about 7 selectors, then it was expanded to include about 12 new CSS2, and then continue to improve in CSS3

CSS selectors can be divided into three main categories, temporary packages such as DOM Selectors, Pseudo Selectors, and Combinators.

Selector Example Example description
.class .intro Selects all elements with class=”intro”
#id #firstname Selects the element with id=”firstname”
* * Selects all elements
element p Selects all <p> elements
element,element div, p Selects all <div> elements and all <p> elements
element element div p Selects all <p> elements inside <div> elements
element>element div > p Selects all <p> elements where the parent is a <div> element
element+element div + p Selects all <p> elements that are placed immediately after <div> elements
element1~element2 p ~ ul Selects every <ul> element that are preceded by a <p> element
[attribute] [target] Selects all elements with a target attribute
[attribute=value] [target=_blank] Selects all elements with target=”_blank”
[attribute~=value] [title~=flower] Selects all elements with a title attribute containing the word “flower”
[attribute|=value] [lang|=en] Selects all elements with a lang attribute value starting with “en”
[attribute^=value] a[href^=”https”] Selects every <a> element whose href attribute value begins with “https”
[attribute$=value] a[href$=”.pdf”] Selects every <a> element whose href attribute value ends with “.pdf”
[attribute*=value] a[href*=”w3schools”] Selects every <a> element whose href attribute value contains the substring “w3schools”
:active a:active Selects the active link
::after p::after Insert something after the content of each <p> element
::before p::before Insert something before the content of each <p> element
:checked input:checked Selects every checked <input> element
:disabled input:disabled Selects every disabled <input> element
:empty p:empty Selects every <p> element that has no children (including text nodes)
:enabled input:enabled Selects every enabled <input> element
:first-child p:first-child Selects every <p> element that is the first child of its parent
::first-letter p::first-letter Selects the first letter of every <p> element
::first-line p::first-line Selects the first line of every <p> element
:first-of-type p:first-of-type Selects every <p> element that is the first <p> element of its parent
:focus input:focus Selects the input element which has focus
:hover a:hover Selects links on mouse over
:in-range input:in-range Selects input elements with a value within a specified range
:invalid input:invalid Selects all input elements with an invalid value
:lang(language) p:lang(it) Selects every <p> element with a lang attribute equal to “it” (Italian)
:last-child p:last-child Selects every <p> element that is the last child of its parent
:last-of-type p:last-of-type Selects every <p> element that is the last <p> element of its parent
:link a:link Selects all unvisited links
:not(selector) :not(p) Selects every element that is not a <p> element
:nth-child(n) p:nth-child(2) Selects every <p> element that is the second child of its parent
:nth-last-child(n) p:nth-last-child(2) Selects every <p> element that is the second child of its parent, counting from the last child
:nth-last-of-type(n) p:nth-last-of-type(2) Selects every <p> element that is the second <p> element of its parent, counting from the last child
:nth-of-type(n) p:nth-of-type(2) Selects every <p> element that is the second <p> element of its parent
:only-of-type p:only-of-type Selects every <p> element that is the only <p> element of its parent
:only-child p:only-child Selects every <p> element that is the only child of its parent
:optional input:optional Selects input elements with no “required” attribute
:out-of-range input:out-of-range Selects input elements with a value outside a specified range
:read-only input:read-only Selects input elements with the “readonly” attribute specified
:read-write input:read-write Selects input elements with the “readonly” attribute NOT specified
:required input:required Selects input elements with the “required” attribute specified
:root :root Selects the document’s root element
::selection ::selection Selects the portion of an element that is selected by a user
:target #news:target Selects the current active #news element (clicked on a URL containing that anchor name)
:valid input:valid Selects all input elements with a valid value
:visited a:visited Selects all visited links
CSS, Front-end, Front-end Develop

How to split columns, create dropcap with css

April 17, 2018

In some books or documents, you will see paragraphs or columns of printed text and occupy a few lines of text. You like it and want your text to have that but do not know how? This article will introduce you to two functions: split column and print the big letter (called Drop Cap)

How to declare columns.

There are three different ways to declare columns:

  1. Declare column-count.
  2. Declare column-width.
  3. Declare both (recommended).

Let’s explore the different ways to declare columns.

Example (Declare column-count) :

div {
-webkit-column-count: 3; /* Chrome, Safari, Opera */
-moz-column-count: 3; /* Firefox */
column-count: 3;
}

Example (Declare column-width.)

div {
-webkit-column-width: 100px; /* Chrome, Safari, Opera */
-moz-column-width: 100px; /* Firefox */
column-width: 100px;
}

Example (Declare both (recommended).

article {

-webkit-columns: 2 200px;

-moz-columns: 2 200px;

columns: 2 200px;

}

/* or */

article {

-webkit-column-count: 2;

-moz-column-count: 2;

column-count: 2;

-webkit-column-width: 200px;

-moz-column-width: 200px;

column-width: 200px;

}

Customizing columns

There are several properties to further customize CSS columns.

  • column-fill : property specifies how to fill columns, balanced or not.
  • column-gap : property specifies the gap between the columns.
  • column-rule :  property sets the width, style, and color of the rule between columns.
  • column-span:  property specifies how many columns an element should span across.

Browser Support

The numbers in the table specify the first browser version that fully supports the property.
Numbers followed by -webkit- or -moz- specify the first version that worked with a prefix.

  • Chomre: 0 4.0 -webkit-
  • Internet Explorer / Edge : 0
  • Firefox: 0 2.0 -moz-
  • Safari: 0 3.1 -webkit-
  • Opera: 0 15.0 -webkit 11.1

Create dropcap:

There are Two different ways to declare create drop caps:

  1. Using ::first-lettet : The ::first-letter selector is used to add a style to the first letter of the specified selector, but no IE < 9 support.

Example :

p:first-child:first-letter {

color: #903;

        font-family: Georgia;

        initial-letter: 2;

}

  1. j ust wrap the first character of the paragraph in a span, then target the span with CSS and style away.

Example :

<p><span class=”firstcharacter”>L</span> orem ipsum dolor sit amet, consectetur adipiscing elit.</p>

.firstcharacter {

  color: #903;

  float: left;

  font-family: Georgia;

  font-size: 75px;

  line-height: 60px;

  padding-top: 4px;

  padding-right: 8px;

  padding-left: 3px;

}

Demo: https://jsfiddle.net/TrinhThang/6mjorye7/9/

CSS, Front-end, Front-end Develop, Uncategorized

Simple tooltip without JavaScript

March 27, 2018

Tooltip is a comment that appears when hovering over an object such as text, images, links, and other interface elements. Content in the tooltip can be text, images or any other information. The purpose of the tooltip is to tell the user what the object is for or to display more information about the object being dragged. We can easily see this application on e-commerce sites. Tooltip often displays additional information about the image, specifications, price of the product you are viewing. The biggest advantage of the tooltip is that it not only displays more information about the object but also saves space on the interface. Let’s learn how to create a tooltip

Create tooltip with extremely simple bootstrap. You simply add the data-toggle = “tooltip” attribute to any element, using the title attribute to define the text that should display the tooltip. Besides, you can also use some other libraries. Today we will guide you to create tooltip without javascript or any library

HTML:

<div class=”container”>

<h1>CSS Directional c-tooltips</h1>

<div class=”demo”>

<p>Data attribute only<a href=”#” data-c-tooltip=”I’m the c-tooltip text”>c-tooltip</a></p>

<p><code>.c-tooltip</code> <a href=”#” class=”c-tooltip” data-c-tooltip=”I’m the c-tooltip text.”>c-tooltip</a></p>

<p><code>.c-tooltip-top</code> <a href=”#” class=”c-tooltip-top” data-c-tooltip=”I’m the c-tooltip text.”>c-tooltip</a></p>

<p><code>.c-tooltip-right</code> <a href=”#” class=”c-tooltip-right” data-c-tooltip=”I’m the c-tooltip text.”>c-tooltip</a></p>

<p><code>.c-tooltip-bottom</code> <a href=”#” class=”c-tooltip-bottom” data-c-tooltip=”I’m the c-tooltip text.”>c-tooltip</a></p>

<p><a href=”#” class=”c-tooltip-left” data-c-tooltip=”I’m the c-tooltip text.”>c-tooltip</a> <code>.c-tooltip-left</code></p>

</div>

</div>

Css:

a:hover {

  text-decoration: none;

}

header,

.demo,

.demo p {

  margin: 4em 0;

  text-align: center;

}


/* Base styles for the element that has a c-tooltip */

[data-c-tooltip],

.c-tooltip {

  position: relative;

  cursor: pointer;

}

/* Base styles for the entire c-tooltip */

[data-c-tooltip]:before,

[data-c-tooltip]:after,

.c-tooltip:before,

.c-tooltip:after {

  position: absolute;

  visibility: hidden;

  -ms-filter: “progid:DXImageTransform.Microsoft.Alpha(Opacity=0)”;

  filter: progid:DXImageTransform.Microsoft.Alpha(Opacity=0);

  opacity: 0;

  -webkit-transition: opacity 0.2s ease-in-out, visibility 0.2s ease-in-out, -webkit-transform 0.2s cubic-bezier(0.71, 1.7, 0.77, 1.24);

  -moz-transition: opacity 0.2s ease-in-out, visibility 0.2s ease-in-out, -moz-transform 0.2s cubic-bezier(0.71, 1.7, 0.77, 1.24);

  transition: opacity 0.2s ease-in-out, visibility 0.2s ease-in-out, transform 0.2s cubic-bezier(0.71, 1.7, 0.77, 1.24);

  -webkit-transform: translate3d(0, 0, 0);

  -moz-transform: translate3d(0, 0, 0);

  transform: translate3d(0, 0, 0);

  pointer-events: none;

}

/* Show the entire c-tooltip on hover and focus */

[data-c-tooltip]:hover:before,

[data-c-tooltip]:hover:after,

[data-c-tooltip]:focus:before,

[data-c-tooltip]:focus:after,

.c-tooltip:hover:before,

.c-tooltip:hover:after,

.c-tooltip:focus:before,

.c-tooltip:focus:after {

  visibility: visible;

  -ms-filter: “progid:DXImageTransform.Microsoft.Alpha(Opacity=100)”;

  filter: progid:DXImageTransform.Microsoft.Alpha(Opacity=100);

  opacity: 1;

}

/* Base styles for the c-tooltip’s  arrow */

.c-tooltip:before,

[data-c-tooltip]:before {

  z-index: 1001;

  border: 6px solid transparent;

  background: transparent;

  content: “”;

}

/* Base styles for the c-tooltip’s  */

.c-tooltip:after,

[data-c-tooltip]:after {

  z-index: 1000;

  padding: 8px;

  width: 160px;

  background-color: #000;

  background-color: rgba(51, 51, 51, 0.9);

  color: #fff;

  content: attr(data-c-tooltip);

  font-size: 14px;

  line-height: 1.2;

}

[data-c-tooltip]:before,

[data-c-tooltip]:after,

.c-tooltip:before,

.c-tooltip:after,

.c-tooltip-top:before,

.c-tooltip-top:after {

  bottom: 100%;

  left: 50%;

}

[data-c-tooltip]:before,

.c-tooltip:before,

.c-tooltip-top:before {

  margin-left: -6px;

  margin-bottom: -12px;

  border-top-color: #000;

  border-top-color: rgba(51, 51, 51, 0.9);

}

/* align top/bottom c-tooltips */

[data-c-tooltip]:after,

.c-tooltip:after,

.c-tooltip-top:after {

  margin-left: -80px;

}

[data-c-tooltip]:hover:before,

[data-c-tooltip]:hover:after,

[data-c-tooltip]:focus:before,

[data-c-tooltip]:focus:after,

.c-tooltip:hover:before,

.c-tooltip:hover:after,

.c-tooltip:focus:before,

.c-tooltip:focus:after,

.c-tooltip-top:hover:before,

.c-tooltip-top:hover:after,

.c-tooltip-top:focus:before,

.c-tooltip-top:focus:after {

  -webkit-transform: translateY(-12px);

  -moz-transform: translateY(-12px);

  transform: translateY(-12px);

}

/* Left */

.c-tooltip-left:before,

.c-tooltip-left:after {

  right: 100%;

  bottom: 50%;

  left: auto;

}

.c-tooltip-left:before {

  margin-left: 0;

  margin-right: -12px;

  margin-bottom: 0;

  border-top-color: transparent;

  border-left-color: #000;

  border-left-color: rgba(51, 51, 51, 0.9);

}

.c-tooltip-left:hover:before,

.c-tooltip-left:hover:after,

.c-tooltip-left:focus:before,

.c-tooltip-left:focus:after {

  -webkit-transform: translateX(-12px);

  -moz-transform: translateX(-12px);

  transform: translateX(-12px);

}

/* Bottom */

.c-tooltip-bottom:before,

.c-tooltip-bottom:after {

  top: 100%;

  bottom: auto;

  left: 50%;

}

.c-tooltip-bottom:before {

  margin-top: -12px;

  margin-bottom: 0;

  border-top-color: transparent;

  border-bottom-color: #000;

  border-bottom-color: rgba(51, 51, 51, 0.9);

}

.c-tooltip-bottom:hover:before,

.c-tooltip-bottom:hover:after,

.c-tooltip-bottom:focus:before,

.c-tooltip-bottom:focus:after {

  -webkit-transform: translateY(12px);

  -moz-transform: translateY(12px);

  transform: translateY(12px);

}

/* Right */

.c-tooltip-right:before,

.c-tooltip-right:after {

  bottom: 50%;

  left: 100%;

}

.c-tooltip-right:before {

  margin-bottom: 0;

  margin-left: -12px;

  border-top-color: transparent;

  border-right-color: #000;

  border-right-color: rgba(51, 51, 51, 0.9);

}

.c-tooltip-right:hover:before,

.c-tooltip-right:hover:after,

.c-tooltip-right:focus:before,

.c-tooltip-right:focus:after {

  -webkit-transform: translateX(12px);

  -moz-transform: translateX(12px);

  transform: translateX(12px);

}

/* Move directional arrows down a bit for left/right c-tooltips */

.c-tooltip-left:before,

.c-tooltip-right:before {

  top: 3px;

}

/* Vertically center c-tooltip content for left/right c-tooltips */

.c-tooltip-left:after,

.c-tooltip-right:after {

  margin-left: 0;

  margin-bottom: -16px;

}

Link demo:https://jsfiddle.net/TrinhThang/5p0f3r1n/1/


CSS, Front-end, Front-end Develop

Bad code in CSS

March 22, 2018

1. Style undo

Any CSS that unsets styles should begin ringing alerts promptly. The very nature of CSS (Cascading Style Sheet) is that things cascade and inherit from those defined previous. Rulesets should just acquire and add to the past ones, never fix.

The illustration gives us all h3 our usual font-size and margin for dividing, yet additionally a bit of padding and border-bottom in order to visually separate it from the following component. There is nothing “ethically wrong”, it is only that you may have most likely connected them too soon and quickly. Imagine a scenario in which there is a condition that we require the h3 but without that border-bottom and padding-bottom.

Bit of cake, we can accomplish such thing by the take after way:

NO. That has completely turned out badly. What did we truly accomplish at last? A modified version of h3 with no border and padding? More like 10 lines of CSS and one super revolting class name.

What may have been exceptional is the version below:

Eight lines. Not radically shorter but rather containing no style undo and a sensible class name.

As you go down a stylesheet you should just ever be including styles, not taking away. In the event that you discover that the more you go down your document, the more recurrence you need to fix styles, well, the odds are you bounced the weapon and began including excessively too early. Envision CSS like this more than a huge number of lines… that is a great deal of superfluous fix.  Try not to begin excessively unpredictable and chance having, making it impossible to fix your work later on; you’ll end up writing more CSS to accomplish less styling.


2. Qualified selectors

Typically when you attempt to qualify something, it is frequently for good reason. In any case, once in a while, you activity may cause calamitous results. Like these:

Fundamentally, selectors which are unnecessarily prepended by a component. These are likewise terrible news since they:

  • Absolutely repress reusability on another component
  • Increment specificity
  • Increment browser workload, clearly diminishing execution.

Why influence a program to search for a class .button on an a when you could simply approach it to search for .button and be finished? By qualifying selectors you are expanding a browser’s workload. By not doing as such, you can:

  • Save actual amounts of code
  • Increment execution
  • Allow greater portability
  • Decrease specificity

Therefore, these bad traits should be corrected like below:

Presently .nav can likewise be connected to an ol, .button can be connected to an input.

CSS

Using CSS to equal height columns without javascript

February 2, 2018

Columns of equal height are required to design the web interface. If all the columns share the same background. If the height of the inner elements are not equal, there will be discrepancies in the interface design of the block as well as the overall appearance of the page.
A few years ago, we used to achieve that effect with some CSS trickery; table display properties for the grid elements was one popular way to get the effect done. Today, we have simple solutions for creating height columns using CSS3.

1. CSS Table properties.
We can make use of Table properties in CSS to achieve equal-height columns . But this is not the ideal solution right now to create layouts, as there are now a number of new alternatives

HTML:

<div class=”col-wrap”>
<div class=”col”>
<h2>Column 1</h2>
<p>Hello World</p>
</div>

<div class=”col”>
<h2>Column 2</h2>
<p>Hello World!</p>
<p>Hello World!</p>
<p>Hello World!</p>
<p>Hello World!</p>
</div>

<div class=”col”>
<h2>Column 3</h2>
<p>Some other text..</p>
</div>
</div>

CSS:

.col-wrap {
display: table;
width: 100%;
}

.col {
display: table-cell;
}
.col:nth-child(even){
background-color:orange;
}
.col:nth-child(odd){
background-color:yellow;
}

2. Using flexbox

Flexbox is way too simplified and easier approach to achieve equal-heighted columns in CSS. You don’t even need to provide a separate row element for the columns, all we need here is to tweak the Flexbox parent and the childs a bit to make them look aligned like a columnar grid.

HTML:

<div class=”f-grid”>
<div class=”f-grid-col”>Lorem ipsum dolor sit amet, consectetur adipisicing elit. Quae, nulla! Assumenda dignissimos harum, molestias iure repudiandae ratione praesentium. Illo facilis et velit ut quam omnis, porro molestiae magni, laboriosam ipsa.
</div>
<div class=”f-grid-col”>Lorem ipsum dolor sit amet, consectetur adipisicing elit. Non, quaerat blanditiis. Eligendi quae tenetur ratione repellendus ut.</div>
<div class=”f-grid-col”>Lorem ipsum dolor sit amet, consectetur adipisicing elit. Quae, nulla! Assumenda dignissimos harum, molestias iure repudiandae ratione praesentium. Illo facilis et velit ut quam omnis, porro molestiae magni, laboriosam ipsa.
</div>
</div>

CSS:

.f-grid {
display: flex;
justify-content: space-between;
margin-left: -1rem;
flex-flow: row wrap;
}

.f-grid-col {
flex: 1 0;
background-color: green;
margin-left: 1rem;
margin-bottom: 1rem;
}

3. Using css grid

The next method we would like to introduce is the method using css grid, This method is slightly more complicated than the aaa sex, you need to calculate the width of the columns inside the parent element.

HTML:

<div class=”g-grid”>
<div class=”g-grid-col”>
Lorem ipsum dolor sit amet, consectetur adipisicing elit. Quia molestiae iure, a laboriosam facere consequuntur repellendus aspernatur porro ut. Doloremque fugiat saepe maiores.
</div>
<div class=”g-grid-col”>
Lorem ipsum dolor sit amet, consectetur adipisicing elit. Architecto incidunt, accusantium, cumque obcaecati similique et ducimus inventore fugiat velit exercitationem dolorem iusto porro repellat accusamus quia eum, quos eveniet expedita!
</div>
<div class=”g-grid-col”>
Lorem ipsum dolor sit amet, consectetur adipisicing elit. Architecto incidunt, quos eveniet expedita!
</div>
</div>

CSS:

 – Using the below formulae:

W(adjusted) = W(original) – (G * (n-1)/n)

.g-grid {
display: grid;
/* W(adjusted) = W(individual) – (1rem * 1/2) */
grid-template-columns: calc(33% – 1rem * 1/2) calc(33.3333% – 1rem * 1/2) calc(33.3333% – 1rem * 1/2);
grid-column-gap: 1rem;
}

.g-grid-col {
padding: 1rem;
background-color:red;
color:#fff;
}

4. You can use some other tricky tricks by using float and float explicitly or using a background gradient

• Equal columns with tag div using float and clear float

HTML:

<div class=’container-wrap’>
<div id=”container4″>
<div id=”container3″>
<div id=”container2″>
<div id=”container1″>
<div id=”col1″>
Lorem ipsum dolor sit amet, consectetur adipisicing elit. Voluptates totam distinctio, voluptatem laboriosam amet. Amet, voluptatum nihil ut officiis explicabo dolore quaerat assumenda officia incidunt aut aliquam, tempora ullam quos.
</div>
<div id=”col2″>
Lorem ipsum dolor sit amet, consectetur adipisicing elit. Deserunt provident quo illo magnam tempore facere fugiat nemo aliquid mollitia omnis amet, doloremque, iusto autem! Tenetur voluptas adipisci suscipit, natus saepe. Sint quia laudantium, iste cumque dolor voluptates laboriosam repellat labore, sequi earum sunt recusandae ipsum, rerum est inventore autem aliquid quasi necessitatibus fugiat.
<!– Column two end –>
</div>
<div id=”col3″>
Lorem ipsum dolor sit amet, consectetur adipisicing elit. Consequatur quibusdam sit ratione quam optio culpa omnis ut reprehenderit ab assumenda deserunt sed enim labore, nisi voluptates inventore odit nostrum maxime. Vero sit nesciunt repellat, facere. Possimus veniam impedit error quia officia labore expedita laudantium tempore, ipsum repudiandae, itaque, eligendi quasi.
</div>
<div id=”col4″>
<!– Column four start –>
<h2>Cross-Browser Compatible</h2>
<p>This 4 column layout has been tested on the following browsers:</p>
<h3>iPhone &amp; iPod Touch</h3>
<ul>
<li>Safari</li>
</ul>
<h3>Mac</h3>
<ul>
<li>Safari</li>
<li>Firefox</li>
<li>Opera 9</li>
<li>Netscape 7 &amp; 9</li>
</ul>
<h3>Windows</h3>
<ul>
<li>Firefox 1.5, 2 &amp; 3</li>
<li>Safari</li>
<li>Opera 8 &amp; 9</li>
<li>Explorer 5.5, 6 &amp; 7</li>
<li>Google Chrome</li>
<li>Netscape 8</li>
</ul>
<!– Column four end –>
</div>
</div>
</div>
</div>
</div>
</div>

CSS:

.container-wrap:after {
display: table;
content: “”;
clear: both;
}
#container4 {
clear: left;
float: left;
width: 100%;
overflow: hidden;
background: #b2f0f9;
}
#container3 {
clear: left;
float: left;
width: 100%;
position: relative;
right: 25%;
background: #89ffa2;
}
#container2 {
clear: left;
float: left;
width: 100%;
position: relative;
right: 25%;
background: #ffa7a7;
}
#container1 {
float: left;
width: 100%;
position: relative;
right: 25%;
background: #fff689;
}
#col1 {
float: left;
width: 21%;
position: relative;
left: 77%;
overflow: hidden;
}
#col2 {
float: left;
width: 21%;
position: relative;
left: 81%;
overflow: hidden;
}
#col3 {
float: left;
width: 21%;
position: relative;
left: 85%;
overflow: hidden;
}
#col4 {
float: left;
width: 21%;
position: relative;
left: 89%;
overflow: hidden;
}

• Equal columns using background

HTML:

<div class=”five-columns group”>
<div class=”col”>
<p>Pellentesque habitant morbi tristique senectus et netus et malesuada fames ac turpis egestas.</p>
</div>
<div class=”col”>
<p>Pellentesque habitant morbi tristique senectus et netus et malesuada fames ac turpis egestas. Vestibulum tortor quam, feugiat vitae, ultricies eget, tempor sit amet, ante. Donec eu libero sit amet quam egestas semper. Aenean ultricies mi vitae est. Mauris placerat eleifend leo.</p>
</div>
<div class=”col”>
<p>Pellentesque habitant morbi tristique senectus et netus et malesuada fames ac turpis egestas.</p>
</div>
</div>

CSS:

.five-columns {
width:100%;
background-image: -webkit-gradient(linear,
left top,
right top,
color-stop(0, #eee),
color-stop(20%, #eee),
color-stop(20%, #ccc),
color-stop(40%, #ccc),
color-stop(40%, #eee),
color-stop(60%, #eee),
color-stop(60%, #ccc),
color-stop(80%, #ccc),
color-stop(80%, #eee),
color-stop(100%, #eee)
);
background-image: -webkit-linear-gradient(
left,
#eee,
#eee 20%,
#ccc 20%,
#ccc 40%,
#eee 40%,
#eee 60%,
#ccc 60%,
#ccc 80%,
#eee 80%,
#eee 100%
);
background-image: -moz-linear-gradient(
left,
#eee,
#eee 20%,
#ccc 20%,
#ccc 40%,
#eee 40%,
#eee 60%,
#ccc 60%,
#ccc 80%,
#eee 80%,
#eee 100%
);
background-image: -ms-linear-gradient(
left,
#eee,
#eee 20%,
#ccc 20%,
#ccc 40%,
#eee 40%,
#eee 60%,
#ccc 60%,
#ccc 80%,
#eee 80%,
#eee 100%
);
background-image: -o-linear-gradient(
left,
#eee,
#eee 20%,
#ccc 20%,
#ccc 40%,
#eee 40%,
#eee 60%,
#ccc 60%,
#ccc 80%,
#eee 80%,
#eee 100%
);
}
.five-columns .col{
width:20%;
}

Link demo: https://jsfiddle.net/TrinhThang/0t7xe6hf/7/

That is the method of column height used today, you can choose the above methods to create beautiful web interface, but the current simple, optimized and most commonly used method is the use of css flexbox.

CSS

Css text gradient

December 8, 2017

Text Gradient is a simple css trick that allows you to improve your site’s appearance by putting gradients on system font titles using nothing but css and a png image. Do you want to create fancy headings without rendering each heading with Photoshop? Here is a simple CSS trick to show you how to create gradient text effect with a PNG image (pure CSS, no Javascript or Flash)

The most important is use property -webkit-background-clip  and -webkit-text-fill-color:

-webkit-text-fill-color : CSS property specifies the fill color of characters of text. If this property is not set, the value of the color property is used. -webkit-background-clip  :  this property will only have a visual effect when the border has transparent regions or partially opaque regions (due to border-style or border-image); otherwise, the border masks the difference. (values: border-box, padding-box, content-box, text)


To make the css text gradient you follow the example below:


HTML:

<h1>Gradient text</h1>

CSS :

h1 {
display: inline-block;
margin: 0 auto;
font-family: “Roboto Slab”;
font-weight: 400;
font-size: 5em;
background: linear-gradient(330deg, #e05252 0%, #99e052 25%, #52e0e0 50%, #9952e0 75%, #e05252 100%);
-webkit-background-clip: text;
-webkit-text-fill-color: transparent;
line-height: 200px;
}

You can replace background is linear-gradient with background is image.

HTML:

<div class=”clip-text clip-text_one”>Cactusthemes</div>

CSS:

.clip-text {
font-size: 6em;
font-weight: bold;
line-height: 1;
position: relative;
display: inline-block;
margin: .25em;
padding: .5em .75em;
text-align: center;
color: #fff;
-webkit-background-clip: text;
-webkit-text-fill-color: transparent;
background-image: url(http://cdn8.staztic.com/app/a/6278/6278761/hd-abstract-wallpapers-1-0-s-307×512.jpg);
}
.clip-text:before {
content: ”;
z-index: -2;
top: 0;
right: 0;
bottom: 0;
left: 0;
background-image: inherit;
position: absolute;
}
.clip-text:after {
content: ”;
position: absolute;
z-index: -1;
top: .125em;
right: .125em;
bottom: .125em;
left: .125em;
background-color: #000;
}

Please note that currently this method currently works only in webkit browsersm, you need fallback color for internet explorer.

Link demo:

https://jsfiddle.net/TrinhThang/vguha0oe/3/