Archives

WordPress Tutorials

How to fix Error Establishing a Database Connection WordPress

April 30, 2018

Error Establshing a database connection is a common error in wordpress website. This article will help you resolve this error, and if you have not encountered this error, don’t ignore it because this error might occur on your website someday.
When you receive the Error Establishing a Database Connection error message when trying to access your website, it means that there is a setting wrong or something is trying to block PHP connection to the MySQL database. We have two ways to fix the Error Establishing a Database Connection on WordPress:

1. Database configurations are not correct.

If for this reason it is too simple for you to fix. Please open the wp-config.php file in the root directory of the website. Please use the Notepad ++ software to open this file.

Go to the section below and edit it according to your database information.

// ** MySQL settings - You can get this info from your web host ** //
/** The name of the database for WordPress */
define( 'DB_NAME', 'database_name_here' );
 
/** MySQL database username */
define( 'DB_USER', 'username_here' );
 
/** MySQL database password */
define( 'DB_PASSWORD', 'password_here' );
 
/** MySQL hostname */
define( 'DB_HOST', 'localhost' );
  • (“DB_NAME”) – Your website database name
  • (“DB_USER”) – Login username for your website database
  • (“DB_PASSWORD”) – Login password for your website database
  • (“DB_HOST”) – It’s usually ‘localhost’, but if your hosting provider using another host name then please contact hosting provider support to get the correct name for host name.

Once you have done, save it and make sure it overwrites the old file. If the problem have been not solved then we continue to overcome the method below.

2. The database is corrupted

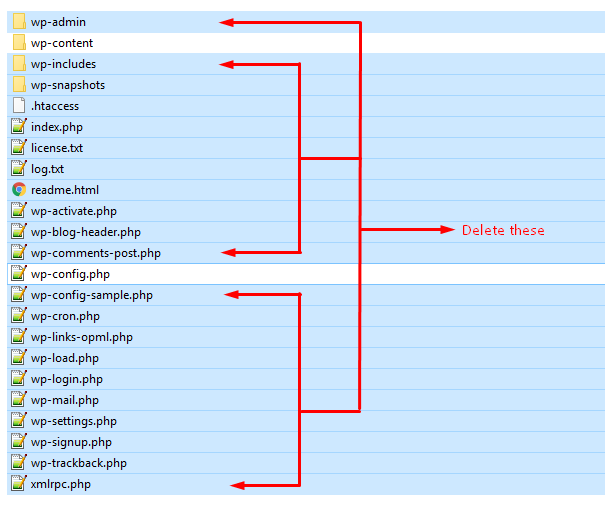
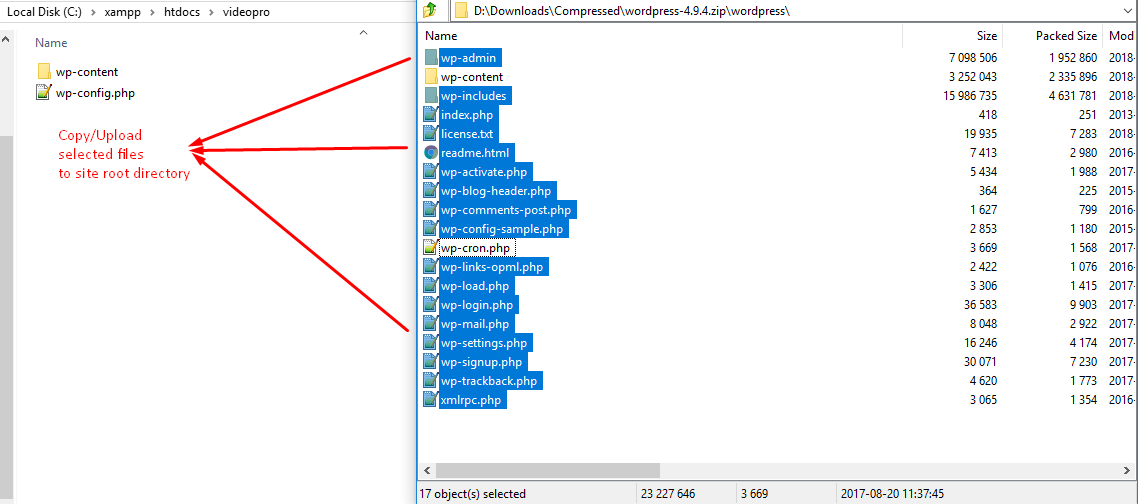
Once the database is corrupted, the only way is re-install. Because when you receive an error establishing database connection it means that you can not connect to the database. And it’s broken and never connected.

To fix this please reopen wp-config.php file and add this to the bottom:

define( 'WP_ALLOW_REPAIR', true );

Save the file and overwrite as the first way, then go to this path of your website URL.

  • www.YOUR_DOMAIN_GOES_HERE.com/wp-admin/maint/repair.php

And you should see this repair screen.

As mentioned above, you will have two options: Repair Databases or Repair and Optimize Databases. Does that mean:

  • Repair Databases: Repair the database
  • Repair and Optimize Databases: Repair and Optimize Databases

Please click on the second option to have WordPress automatically repair and optimize your Databases. When all is done you MUST delete the code above, otherwise anyone can access and repair your site.

That’s it

The above are two quickest ways for you to fix the Error Establishing a WordPress Database Connection when you encounter. And if both of these methods are not effective then it is best to switch your Hosting to another provider because if you’re using free hosting or hosting is weak, you might meet this problem regularly.

WordPress Plugins, WordPress Tips

How to show/hide content on specific pages?

April 20, 2018

WordPress provides Conditional Tags to control how a content is displayed on template files base on specific conditions. However, when we need to do this on dynamic content, we cannot use original Conditional Tags PHP code. Don’t worry, WP Conditional Shortcodes plugin will help you to accomplish this.

Download and Install

You can install and active WP Conditional Shortcodes directly in WP Admin Dashboard, or download the plugin package from here.

How to use it?

As you know, WordPress has many conditional tags, but this plugin only supports some basic conditionals tags which comes in shortcode format. Every shortcodes would includes its contents if the condition is true.

Here’s the list of supported shortcodes matches with its conditional.

  • is_single – if showing a single post. Use the optional parameter “ids” to specify specific posts.
  • is_singular – if showing a single post or page.
  • is_page – if showing a page. Use the optional parameter “ids” to specify specific pages.
  • is_home – if showing the blog home.
  • is_front_page – if showing the front page of the site.
  • is_sticky – if the current post or page is ‘sticky’.
  • is_category – if showing a category-based archive. Use the optional parameter “ids” to specify specific categories.
  • is_page – if showing a page.
  • is_tag – if showing a tag-based archive.
  • is_tax – if showing a tag- or category-based archive.
  • is_author – if showing an author-based archive.
  • is_archive – if showing any archive.
  • is_year – if showing a yearly archive.
  • is_month – if showing a monthly archive.
  • is_day – if showing a daily archive.
  • is_time – if showing an hourly or shorter archive.
  • is_feed – if generating a feed.
  • is_search – if showing search results.
  • comments_open – if comments are open for the current post or page.

Especially, with  is_page, is_category and is_single shortcodes, you also can use ids=”” attribute to list of the ids that you want to apply the condition.

For example :

[is_page ids="76, 339"]hello[/is_page]

[is_category ids="5, 7"]hello[/is_page]

[is_single ids="94, 63"]hello[/is_single]

In the reverse, you can use prefix not_ before the shortcode name to negative the condition and use it as a if else condition with the positive condition.

[is_single]
This is only shown if showing just this post.
[not_single]
This is shown everywhere else.
[/is_single]
WordPress Tutorials

How to downgrade/upgrade WordPress to specific version

April 3, 2018

Upgrading and downgrading the WordPress to a specific version is essential to get core version matches your theme and plugins to work on perfectly. However, WordPress doesn’t offer an official option to do it, so we need to do some tricks to accomplish this.

Upgrade/Downgrade Manually

You can download your desired WordPress version zip file in here.

If you already have WordPress source code file and FTP account or File Manager, this manual way would be more faster than using plugin.

Please follow these steps to upgrade or downgrade WordPress core manually :

  1. Delete old files
    Go to your website root directory, select and delete all files and directories but wp-content folder and wp-config.php file.
  2. Copy/Upload new files 

    After deleted old files, you should have wp-content folder and wp-config.php file left.
    Then from WordPress core package, upload/copy all folders and files except wp-content folder and wp-config.php file to your website root directory

Then you will got your desired WordPress core version without loosing any data or reinstall WordPress configuration.

Upgrade/Downgrade using Plugin

There are few plugins that would help WordPress Admin to downgrade or upgrade their site safely and easily. One of them is WP Downgrade plugin.

  1. Install and active plugin 
    You can go to Site Admin Dashboard > Plugins > Add New > search for WP Downgrade > Install > Active or download zip file in here.
  2. Config the desired version to downgrade/upgrade 

    After installed and activated successfully, please go to Settings > WP Downgrade, then enter your desired version in WordPress Target Version > Save Changes.

  3. Go to Update Core page 

    Once you saved the target version and it’s valid version, then you will see this section in bottom of WP Downgrade setting page, please follow the instruction and go to Update Core page.

  4. Start upgrading/downgrading
    In Update Core page, you should see a Re-Install Now button to re-install WordPress core. Click on that button to start upgrading/downgrading.

    The progress would take a while to complete.
WordPress Plugins, WordPress Tutorials

How to get Facebook Live Chat on WordPress website

February 6, 2018

Currently, there are many plugins support adding Facebook messenger feature into your WordPress website. However most of these plugins only allow us to send our first message to Facebook page and you are unable to live chat on your website.

Although, recently Facebook is developing on a messenger platform that provides a customer chat plugin base on Javascript and it can be easily embed on any website platform, includes WordPress.

And WP-Chatbot is a WordPress plugin which can help you to integrate Facebook Live Chat feature with your WordPress website easily. It’s simple but useful, the plugin will give you many options to setup your Facebook Live Chat.

Please follow these steps to install and get Facebook Live Chat ready on WordPress site.

Install plugin

Download or install WP Chatbot for facebook Messenger plugin at https://wordpress.org/plugins/wp-chatbot/

Config WP-Chatbot Settings

On WP-Chatbot Settings page, Facebook App ID and Facebook Page ID is required to enable live chat feature.

  • Facebook App ID : Please follow the instructions in this document to create Facebook App and get Facebook App ID : https://holithemes.com/wp-chatbot/facebook-app-id/
  • Facebook Page ID : You can easily find the Page ID in Facebook Page > About > Page ID or go to https://findmyfbid.com/ to find your Page ID from URL.

Config Facebook Page Setting

You need to add your website address to Facebook Page Whitelisted Domains to authorize the Facebook Page Messenger. Go to Page > Settings > Messenger Platform > Whitelisted Domains.

Add shortcode to website

WP-Chatbot will provides you the shortcode to show Facebook Live Chat in your website front-end. The shortcode will depends on what you set on WP-Chatbot Settings > Shortcode name. By default, the shortcode is [chatbot].

You can put this anywhere on your website to show the Facebook Live Chat. In this example, I would use Text widget to paste this shortcode and place it in any Sidebar of your theme.

Please note : Where ever you place the shortcode, then the Facebook Live Chat will only be displayed in the bottom right corner of the site.


WordPress Plugins

How to get Disqus Comment for WordPress Website

January 8, 2018

Disqus is a popular network comments platform which is trusted by hundreds of thousands sites to feature the comment system with social network integration. Disqus Comments has a good looking, it works perfectly on all devices from desktop to mobile and especially it supports over than 70 languages.

Disqus Comment System plugin official released by Disqus will help you to bring Disqus Comment to your WordPress website easily.

However, there are still some steps that you need to get through to accomplish the Disqus installation progress on your site.

This article will be very helpful if you wanna install Disqus Comment System on your WordPress Site.

  1. First of all, you need to download and install Disqus Comment System on WordPress Plugins site.
  2. Go to Dashboard > Comments > Disqus and click on Upgrade button in Upgrade Disqus Comments screen.
  3. After done of upgrading, Disqus would require user login to install Disqus Comments. If you have not account yet, please move to the next step.
  4. Go to Disqus Signup/Login to register your Disqus account, you need to fill-in all fields to accomplish account signup
  5. After Signup successfully, you will be redirected to Create a new site page. Website Name can be anything that you want to name for your new site, and select proper Category for this site.
  6. In Select Plan page, you can select your wanted plan for this site, in this case I would use Basic plan, which is Free and Ads supported.
  7. In the next step, you will need to choose the platform that your site is on, and of course, the platform we are working on is WordPress.
  8. After selecting the platform, you will see the Install instructions which we have done already.
  9. After this step, please get back to WordPress Dashbard > Comments > Disqus and Login your Disqus Account to complete the installation.
  10. Then you will get the Disqus Comment System on your WordPress Site which would be replaced completely for default Comment form from your current WordPress theme.

Note :

  • Disqus Comment System will override the default Comment system from WordPress, so all of your old Comment data will not be loaded in Disqus Comment.
  • To configure Disqus Comment on your site, you need to the URL that you have been created on Disqus to moderate it. Or you can go to Dashboard > Comments > Disqus to find the link to Go to Disqus Moderation.
Wordpress Developer

Change PHP configuration options without editing php.ini

January 2, 2018

PHP options is usually already configured at the server of your website. In many cases, the PHP configurations is set up with limited numbers that will not fit and meet your needs. For example, you can change the upload max size to increase the file size that you want to upload or the max execution time to run a script.

Normally, all of PHP settings are located in php.ini file of PHP directory on your server. However, in most cases if you are on shared host, you will not be able to find and edit this php.ini file.

Changing PHP configurations is necessary to extend that limit. And to change the PHP configuration, the easiest way is to contact the hosting service provider for support. In addition, you also can change the PHP configuration by one of three ways below.

1. Edit Theme Functions file

Some cases will be solved easily by using ini_set function to set PHP configuration from theme function file by this syntax.

@ini_set( '{option_name}' , '{value_to_set}' );

For example, if you want to change the upload_max_filesize to 64M, the completed syntax would be like this

@ini_set( 'upload_max_size' , '64M' );

Note : Not all the available options can be changed using ini_set(). There is a list of all available options in the appendix.

2. Edit htaccess file

In the root directory, you can find .htaccess file easily. And you can use this syntax to change the PHP configuration options.

php_value {option_name} {value_to_set}

For example, if you want to change the upload_max_filesize to 64M, the completed syntax would be like this

php_value upload_max_filesize 64M

And please note that these tricks may not work in some cases which hosting provider doesn’t allow to override the PHP configuration options. Then you need to contact your web hosting providers to get these changes.

WordPress Tips

How to Change Default Post Format in WordPress

November 1, 2017

What is WordPress Post Formats?

Since version 3.1, WordPress has a theme feature called Post Formats, which is a piece of meta information that can be used by a theme to customize its presentation of a post. Post formats is an optional value which would allows developers to define visual representation of a post.

WordPress has a total of 10 post formats, which are :

  • Standard – The default post format
  • Aside – A note like post, usually styled without title.
  • Gallery – A gallery of images.
  • Link – A link to another site.
  • Image – An image or photograph
  • Quote – A quotation.
  • Status – Twitter like short status update
  • Video – A post containing video
  • Audio – An audio file.
  • Chat – A chat transcript

However, not every theme supports all of these formats and some themes or plugins have features or template only for some specific post formats.

How to change default Post Format?

For example, VideoPro is a video-based WordPress theme, so it would use the Video post format mostly, then you will need to select Post format option everytime you want to add a new video post.

In fact, WordPress also give us a Setting to set default Post format for Post, which would save you a lot of time if you usually use another post format not Standard.

Just simply follow these steps (for more details, please find the screenshot below) :

  1. Go to Settings > Writing.
  2. In Writing Settings page, you will find Default Post Format section.
  3. Select the post format that you want to be default.
  4. Save Changes.

Then here you are, you will no longer need to select post format for posts every time you want to create one.