Browsing Category

WordPress Tutorials

WordPress Tips, WordPress Tutorials

CSS Gradient Border Colors

June 19, 2018

In the past, to create special borders like gradient we often use images.  Today, it becomes much cleaner with the use of CSS3 Gradient Border color. The method is by using CSS3 border-image property. The border-image property in CSS3 allows us to fill the border with an image as well as CSS3 Gradient. The browsers support for border-image are quite great; Chrome, Internet Explorer 11, Firefox, Safari, and Opera are all capable to fully render border-image. Following I have made a little example by applying CSS3 Gradient border color. Well, let’s see how the trick works.

HTML:

<div class=”c-boder”>

<p>Lorem Ipsum is simply dummy text of the printing and typesetting industry. Lorem Ipsum has been the industry’s standard dummy text ever since the 1500s</p>

</div>


<div class=”c-boder-1″>

Cactustheme

</div>


CSS:

.c-boder {

clear: both;

margin: 20px auto;

padding: 10px;

width: 200px;

height: 100px;

border-top: 3px solid black;

background-image: -webkit-gradient(linear, 0 0, 0 100%, from(#000), to(transparent));

background-image: -webkit-linear-gradient(#000, transparent);

background-image:-moz-linear-gradient(#000, transparent),-moz-linear-gradient(#000, transparent);

background-image:-o-linear-gradient(#000, transparent),-o-linear-gradient(#000, transparent);

background-image: linear-gradient(#000, transparent),linear-gradient(#000, transparent);

-moz-background-size: 3px 100%;

background-size: 3px 100%;

background-position: 0 0, 100% 0;

background-repeat: no-repeat;

}

.c-boder-1 {

font-size: 70px;

line-height: 170px;

margin: 50px auto;

font-weight: bold;

width: 450px;

padding: 20px;

text-align: center;

height: 250px;

color: #3ACFD5;

border-top: 20px solid #3ACFD5;

border-bottom: 20px solid #3a4ed5;

-webkit-box-sizing: border-box;

-moz-box-sizing: border-box;

box-sizing: border-box;

background-position: 0 0, 100% 0;

background-repeat: no-repeat;

-webkit-background-size: 20px 100%;

-moz-background-size: 20px 100%;

background-size: 20px 100%;

background-image: -webkit-linear-gradient(top, #3acfd5 0%, #3a4ed5 100%), -webkit-linear-gradient(top, #3acfd5 0%, #3a4ed5 100%);

background-image: -moz-linear-gradient(top, #3acfd5 0%, #3a4ed5 100%), -moz-linear-gradient(top, #3acfd5 0%, #3a4ed5 100%);

background-image: -o-linear-gradient(top, #3acfd5 0%, #3a4ed5 100%), -o-linear-gradient(top, #3acfd5 0%, #3a4ed5 100%);

background-image: linear-gradient(to bottom, #3acfd5 0%, #3a4ed5 100%), linear-gradient(to bottom, #3acfd5 0%, #3a4ed5 100%);

}

Link demo: https://jsfiddle.net/TrinhThang/mr9soh0u/10/

Note: The border-image will only work on rectangular shapes or boxes. That means adding border-radius will deviate the border-image output.

WordPress Tips, WordPress Tutorials

MySQL manipulation with WordPress

June 9, 2018

WordPress is the leading blogging platform. In the last decade or so, it has been adopted as a great platform for building dynamic websites. The reason for its increased popularity can be attributed to its huge community and user-friendly interface. One thing that most people don’t know is that this platform is PHP based and uses MySQL database as the backend database.

MySQL is a database management system that is used by WordPress to store and retrieve all your blog information. MySQL is an open source relational database management system. It runs as a server and allows multiple users to manage and create numerous databases.

This article will provide some important guidelines when manipulation your MySQL database manually for your website or blog with wordpress

WordPress provides a global object variable, $wpdb, which is an instantiation of the wpdb class defined in /wp-includes/wp-db.php. By default, $wpdb is instantiated to talk to the WordPress database. To access $wpdb in your WordPress PHP code, declare $wpdb as a global variable using the global keyword, or use the superglobal $GLOBALS in the following manner:

Example:

// 1st Method – Declaring $wpdb as global and using it to execute an SQL query statement that returns a PHP object

global $wpdb;
$results = $wpdb->get_results( "SELECT * FROM {$wpdb->prefix}options WHERE option_id = 1", OBJECT );

// 2nd Method – Utilizing the $GLOBALS superglobal. Does not require global keyword ( but may not be best practice )

$results = $GLOBALS['wpdb']->get_results( "SELECT * FROM {$wpdb->prefix}options WHERE option_id = 1", OBJECT );

Assuming that the table prefix is wp_:

$wpdb->posts will correspond to wp_posts table
$wpdb->postmeta will correspond to wp_postmeta table
$wpdb->users will correspond to wp_users table

INSERT ROWS

Insert a row into a table. This function returns false if the row could not be inserted. Otherwise, it returns the number of affected rows (which will always be 1).

$wpdb->insert( $table, $data, $format );

Parameters

table
(string) The name of the table to insert data into.
data
(array) Data to insert (in column => value pairs). Both $data columns and $data values should be “raw” (neither should be SQL escaped).
format
(array|string) (optional) An array of formats to be mapped to each of the values in $data. If string, that format will be used for all of the values in $data. If omitted, all values in $data will be treated as strings unless otherwise specified in wpdb::$field_types.

Examples

$wpdb->insert( 'table', array( 'column1' => 'value1', 'column2' => 123 ), array( '%s', '%d' ) );

UPDATE ROWS

Update a row in the table. Returns false if errors, or the number of rows affected if successful.

$wpdb->update( $table, $data, $where, $format = null, $where_format = null );

Parameters

table
(string) The name of the table to update.
data
(array) Data to update (in column => value pairs). Both $data columns and $data values should be “raw” (neither should be SQL escaped). This means that if you are using GET or POST data you may need to use stripslashes() to avoid slashes ending up in the database.
where
(array) A named array of WHERE clauses (in column => value pairs). Multiple clauses will be joined with ANDs. Both $where columns and $where values should be “raw”.
format
(array|string) (optional) An array of formats to be mapped to each of the values in $data. If string, that format will be used for all of the values in $data.
where_format
(array|string) (optional) An array of formats to be mapped to each of the values in $where. If string, that format will be used for all of the items in $where.
Possible format values: %s as string; %d as integer (whole number) and %f as float. (See below for more information.) If omitted, all values in $where will be treated as strings.

Examples

$wpdb->update( ‘table’, array(
‘column1’ => ‘value1’, // string
‘column2’ => ‘value2’ // integer (number)
),
array( ‘ID’ => 1 ),
array(
‘%s’, // value1
‘%d’ // value2
),
array( ‘%d’ )
);

DELETE ROWS

The delete function was added in WordPress 3.4.0, and can be used to delete rows from a table. It returns the number of rows updated, or false on error.

$wpdb->delete( $table, $where, $where_format = null );

Parameters

$table
(string) (required) Table name.
Default: None
$where
(array) (required) A named array of WHERE clauses (in column -> value pairs). Multiple clauses will be joined with ANDs. Both $where columns and $where values should be ‘raw’.
Default: None
$where_format
(string/array) (optional) An array of formats to be mapped to each of the values in $where. If a string, that format will be used for all of the items in $where. A format is one of ‘%d’, ‘%f’, ‘%s’ (integer, float, string; see below for more information). If omitted, all values in $where will be treated as strings unless otherwise specified in wpdb::$field_types.
Default: null

Examples
// Default usage.
$wpdb->delete( 'table', array( 'ID' => 1 ) );

// Using where formatting.
$wpdb->delete( 'table', array( 'ID' => 1 ), array( '%d' ) );


And to find out more about $wpdb, you can visit the following link: WordPress Codex

Finally, we hope the above information will help you work better MySQL with WordPress

Too see more awesome entry from Cactusthemes, please visit our Blog!

WordPress Tutorials

How to fix Error Establishing a Database Connection WordPress

April 30, 2018

Error Establshing a database connection is a common error in wordpress website. This article will help you resolve this error, and if you have not encountered this error, don’t ignore it because this error might occur on your website someday.
When you receive the Error Establishing a Database Connection error message when trying to access your website, it means that there is a setting wrong or something is trying to block PHP connection to the MySQL database. We have two ways to fix the Error Establishing a Database Connection on WordPress:

1. Database configurations are not correct.

If for this reason it is too simple for you to fix. Please open the wp-config.php file in the root directory of the website. Please use the Notepad ++ software to open this file.

Go to the section below and edit it according to your database information.

// ** MySQL settings - You can get this info from your web host ** //
/** The name of the database for WordPress */
define( 'DB_NAME', 'database_name_here' );
 
/** MySQL database username */
define( 'DB_USER', 'username_here' );
 
/** MySQL database password */
define( 'DB_PASSWORD', 'password_here' );
 
/** MySQL hostname */
define( 'DB_HOST', 'localhost' );
  • (“DB_NAME”) – Your website database name
  • (“DB_USER”) – Login username for your website database
  • (“DB_PASSWORD”) – Login password for your website database
  • (“DB_HOST”) – It’s usually ‘localhost’, but if your hosting provider using another host name then please contact hosting provider support to get the correct name for host name.

Once you have done, save it and make sure it overwrites the old file. If the problem have been not solved then we continue to overcome the method below.

2. The database is corrupted

Once the database is corrupted, the only way is re-install. Because when you receive an error establishing database connection it means that you can not connect to the database. And it’s broken and never connected.

To fix this please reopen wp-config.php file and add this to the bottom:

define( 'WP_ALLOW_REPAIR', true );

Save the file and overwrite as the first way, then go to this path of your website URL.

  • www.YOUR_DOMAIN_GOES_HERE.com/wp-admin/maint/repair.php

And you should see this repair screen.

As mentioned above, you will have two options: Repair Databases or Repair and Optimize Databases. Does that mean:

  • Repair Databases: Repair the database
  • Repair and Optimize Databases: Repair and Optimize Databases

Please click on the second option to have WordPress automatically repair and optimize your Databases. When all is done you MUST delete the code above, otherwise anyone can access and repair your site.

That’s it

The above are two quickest ways for you to fix the Error Establishing a WordPress Database Connection when you encounter. And if both of these methods are not effective then it is best to switch your Hosting to another provider because if you’re using free hosting or hosting is weak, you might meet this problem regularly.

WordPress Tutorials

How to downgrade/upgrade WordPress to specific version

April 3, 2018

Upgrading and downgrading the WordPress to a specific version is essential to get core version matches your theme and plugins to work on perfectly. However, WordPress doesn’t offer an official option to do it, so we need to do some tricks to accomplish this.

Upgrade/Downgrade Manually

You can download your desired WordPress version zip file in here.

If you already have WordPress source code file and FTP account or File Manager, this manual way would be more faster than using plugin.

Please follow these steps to upgrade or downgrade WordPress core manually :

  1. Delete old files
    Go to your website root directory, select and delete all files and directories but wp-content folder and wp-config.php file.
  2. Copy/Upload new files 

    After deleted old files, you should have wp-content folder and wp-config.php file left.
    Then from WordPress core package, upload/copy all folders and files except wp-content folder and wp-config.php file to your website root directory

Then you will got your desired WordPress core version without loosing any data or reinstall WordPress configuration.

Upgrade/Downgrade using Plugin

There are few plugins that would help WordPress Admin to downgrade or upgrade their site safely and easily. One of them is WP Downgrade plugin.

  1. Install and active plugin 
    You can go to Site Admin Dashboard > Plugins > Add New > search for WP Downgrade > Install > Active or download zip file in here.
  2. Config the desired version to downgrade/upgrade 

    After installed and activated successfully, please go to Settings > WP Downgrade, then enter your desired version in WordPress Target Version > Save Changes.

  3. Go to Update Core page 

    Once you saved the target version and it’s valid version, then you will see this section in bottom of WP Downgrade setting page, please follow the instruction and go to Update Core page.

  4. Start upgrading/downgrading
    In Update Core page, you should see a Re-Install Now button to re-install WordPress core. Click on that button to start upgrading/downgrading.

    The progress would take a while to complete.
WordPress Plugins, WordPress Tutorials

How to get Facebook Live Chat on WordPress website

February 6, 2018

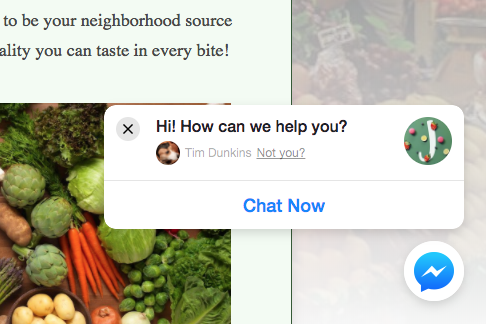
Currently, there are many plugins support adding Facebook messenger feature into your WordPress website. However most of these plugins only allow us to send our first message to Facebook page and you are unable to live chat on your website.

Although, recently Facebook is developing on a messenger platform that provides a customer chat plugin base on Javascript and it can be easily embed on any website platform, includes WordPress.

And WP-Chatbot is a WordPress plugin which can help you to integrate Facebook Live Chat feature with your WordPress website easily. It’s simple but useful, the plugin will give you many options to setup your Facebook Live Chat.

Please follow these steps to install and get Facebook Live Chat ready on WordPress site.

Install plugin

Download or install WP Chatbot for facebook Messenger plugin at https://wordpress.org/plugins/wp-chatbot/

Config WP-Chatbot Settings

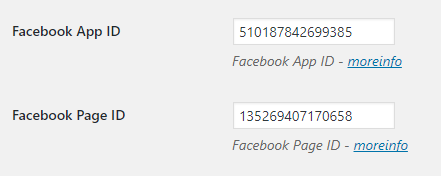
On WP-Chatbot Settings page, Facebook App ID and Facebook Page ID is required to enable live chat feature.

  • Facebook App ID : Please follow the instructions in this document to create Facebook App and get Facebook App ID : https://holithemes.com/wp-chatbot/facebook-app-id/
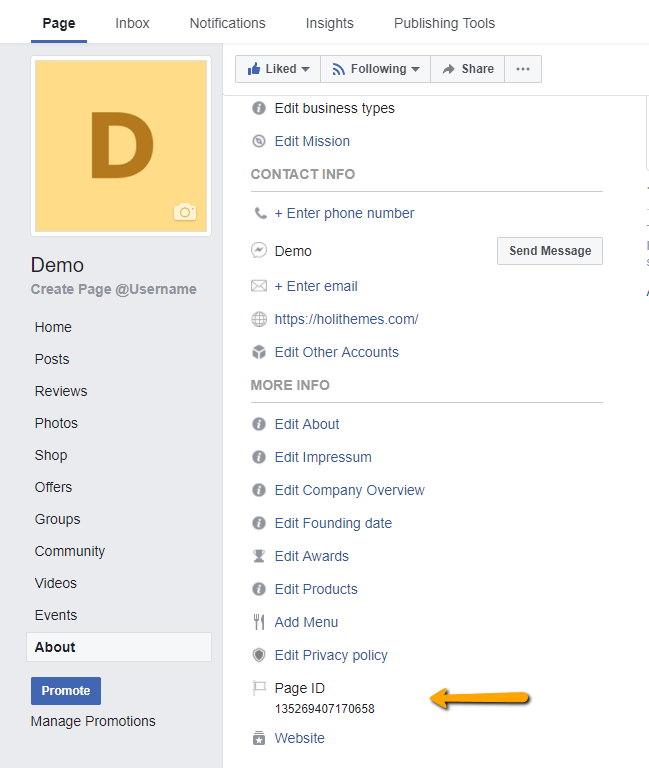
  • Facebook Page ID : You can easily find the Page ID in Facebook Page > About > Page ID or go to https://findmyfbid.com/ to find your Page ID from URL.

Config Facebook Page Setting

You need to add your website address to Facebook Page Whitelisted Domains to authorize the Facebook Page Messenger. Go to Page > Settings > Messenger Platform > Whitelisted Domains.

Add shortcode to website

WP-Chatbot will provides you the shortcode to show Facebook Live Chat in your website front-end. The shortcode will depends on what you set on WP-Chatbot Settings > Shortcode name. By default, the shortcode is [chatbot].

You can put this anywhere on your website to show the Facebook Live Chat. In this example, I would use Text widget to paste this shortcode and place it in any Sidebar of your theme.

Please note : Where ever you place the shortcode, then the Facebook Live Chat will only be displayed in the bottom right corner of the site.


WordPress Tutorials

PHP tricks

December 19, 2017

Using @ to disable errors

If you find an error message particularly annoying and you are sure it definitely does not apply to you, PHP has a method for you to silence the message entirely. If you place an at symbol, @, before a function that generates an error, PHP will catch the error and silence it entirely. Consider the following two complete scripts:

Script 1

<?php
cactus();
?>

Script 2

<?php
@cactus();
?>

In script one, the undefined function cactus() is called. When this script is run, PHP will halt execution at the undefined function, and print out a fatal error message. However, when the second script is run, PHP will attempt to call the cactus() function, fail, but will not halt execution or print out an error – all thanks to the @ symbol before the function call.

While there are legitimate uses for suppressing errors in this way, it is not advised, because it usually works in the same way that sweeping dust under a carpet does not make a house any cleaner – hiding a problem is not the same as solving it! If you explicitly wish to have errors suppressed with @, it is strongly advised that you always write your own code to check return values of functions.

Removing HTML from a string

string strip_tags ( string source [, string allowable_tags])

strip_tags() is a function that allows you to strip out all HTML and PHP tags from a given string (parameter one), however you can also use parameter two to specify a list of HTML tags you want.

This function can be very helpful if you ever display user input on your site. For example, if you create your own messageboard forum on your site a user could post a title along the lines of: <h1>HELLO WORLD!</h1>, which, because you would display the titles of each post on your board, would display their unwanted message in huge letters on your visitors’ screens.

Here are two examples of stripping out tags:

<?php

$input = “<i><h1>Hello World!</h1></i>”;
$a = strip_tags($input);
$b = strip_tags($input, “<h1><b>”);

?>

After running that script, $a will be set to “Hello World!”, whereas $b will be set to “<h1>Hello World!</h1>” because we had “<h1>” in the list of acceptable tags.

PHP Output Buffering

bool ob_start ( [callback output_function])
bool ob_end_flush ( void )
bool ob_end_clean ( void )

There are two ways to start buffering output: through a setting in php.ini to enable output buffering for all scripts, or by using a function call on a script-by-script basis. Surprisingly, the latter is preferred – it makes your code more portable, and also gives you greater flexibility.

To create a new output buffer and start writing to it, call ob_start(). There are two ways to end a buffer, which are ob_end_flush() and ob_end_clean() – the former ends the buffer and sends all data to output, and the latter ends the buffer without sending it to output. Every piece of text outputted while an output buffer is open is placed into that buffer as opposed to being sent to output. Consider the following script:

<?php
ob_start();
print “Hello First!\n”;
ob_end_flush();

ob_start();
print “Hello Second!\n”;
ob_end_clean();

ob_start();
print “Hello Third!\n”;
?>


That script will output “Hello First” because the first text is placed into a buffer then flushed with ob_end_flush().
The “Hello Second” will not be printed out, though, because it is placed into a buffer which is cleaned using ob_end_clean() and not sent to output.
Finally, the script will print out “Hello Third” because PHP automatically flushes open output buffers when it reaches the end of a script.

WordPress Themes, WordPress Tips, WordPress Tutorials

Awesome things you can do with WordPress Widgets in 2017

December 18, 2017

As you know WordPress has released two versions of its adjustment in 2017: version 4.8 “Evans” and version 4.9 “Tipton”. Here are the great features that WordPress upgrades to Widgets:

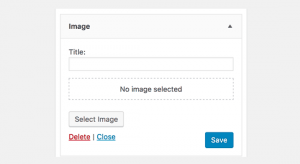
The New Image Widget

WordPress 4.8 will introduce an image widget which will allow users to easily add images to the sidebar. You will be able to upload or select an image from the WordPress media library. Clicking on the select image will open the WordPress media uploader popup where users can upload or select an image. After inserting the image, users will be able to see a preview of the image in the widget area.

Wordpress Image Widget

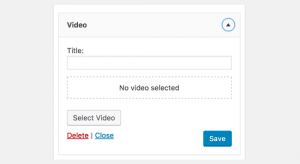
The New Video Widget

Similar to the image widget, WordPress 4.8 will also introduce the Video widget. It will allow users to easily upload videos to their sidebar or display any video from YouTube, Vimeo, or any other Oembed provider.  Add the URL of the video you want to embed and then click on the ‘Add to widget’ button. The media uploader popup will disappear, and you will see a thumbnail preview of your video inside the widget.

Wordpress Video Widget


The New Audio Widget

Are you a podcaster, musician, or avid blogger? Adding a widget with your audio file has never been easier. Upload your audio file to the Media Library, go to the widget settings, select your file, and you’re ready for listeners. This would be an easy way to add a more personal welcome message, too!

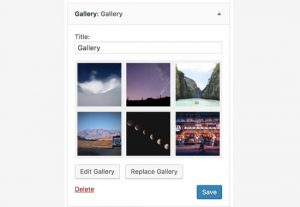
The New Gallery Widget

WordPress 4.9 allows you to have a new Gallery widget to manage it your way. The functionality of gallery widget is as simple as it can get, just simply add images from your WordPress image library by using the Add Images button. You can also use this widget as a temporary way of making people intrigued on your social media platforms like Instagram and Pinterest by viewing thumbnails to create a collage of a single snapshot. So this new gallery widget feature in WordPress 4.9 will definitely create a lot of interest to more of your posts now.

Wordpress Gallery Widget

New and improved text widget

Like it or not, the current default text widget in WordPress is not the most useful thing for the regular user. It supports only raw text (or HTML code) and gives you no formatting tools at all. But the new text widget is set to change that with the inclusion of visual editor. Quite similarly, you will be able to switch between Visual and Text when editing widget content. And, yes, you get some standard formatting tools in both modes. I personally believe that this will finally make the text widget a usable tool for the non-code-savvy user who wants to include some custom content into a widget area. This is overall a great step towards putting the spotlight on the end user and their needs!

Previously, you need to have a basic knowledge of HTML and CSS to use media in Text Widget. With WordPress 4.9, you will have the “Add Media” button so you could insert images, videos, audio in the Text Widget easily.

Shortcodes in Text Widget

WordPress now parses shortcodes, and makes them work in a widget.


WordPress Tutorials

WordPress Overview and compare with Joomla

November 7, 2017

1. What’s WordPress

  • WordPress is an online, open source website creation tool written in PHP. But in non-geek speak, it’s probably the easiest and most powerful blogging and website content management system (or CMS) in existence today.
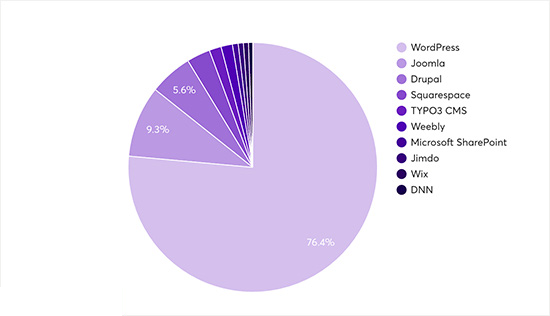
  • WordPress is definitely the world’s most popular CMS. It accounts for 76.4% of CMS market share

2. Advantages and disadvantages of wordpress

  • Advantages of WordPress
    • Easy in use
      • Using WordPress basic sites can be set up with easy access to all on page text and images. Beyond that, with a little upfront technical work, there are many ways to set up custom modules and text areas which, once implemented, can easily be accessed and edited by anyone with rudimentary computer skills.
      • WordPress does not require PHP nor HTML knowledge unlinke Drupal or Joomla. A preinstalled plugin and template function allows them to be installed very easily. All you need to do is to choose a plugin or a template and click on it to install.
    • Cheaper to build
      • WordPress offers a huge variety of themes which can be used to build the website.  When you begin with a theme, you cut down significantly on the amount of time it takes to build a website.
      • The cost of purchasing and installing a commercial WordPress theme is much cheaper. The cost and time for developing a WordPress site is considerably lesser than creating a custom built website.
    • Large developer community creating themes and plugins 
      • WordPress offers more paid and unpaid themes and plugins than any other Content Management Systems. This means that when you want a feature added to your website, there is a good chance that you will be able to find a plugin that exists for it.
    • Open Source
      • WordPress, and many of the themes and plugins for WordPress, are freely available as Open Source code under the GPLv2 license. It means you can use there without paying any cost.
    • Search Engine Optimization Tools
      • WordPress offers several great search engine optimization tools that make doing your own on-site SEO simple
    • E-commerce options is available on WordPress
      • There are suitable e-commerce integrations for nearly any size site or application, and many basic plug-ins are free. Woocommerce is extremely effective in doing all this along with offering great reports features.
  • Disadvantages of wordpress
    • Easy for hackers to find security holes
      • As you know WordPress theme and plugins are freely available on internet as Open Source code under the GPLv2 license. So it is easy for hackers to find security holes.
    • WordPress needs to be updated regularly
      • WordPress needs to be updated regularly because various updates and patches get released every year to combat pirates and hackers as well as to provide improvements to code and themes.
    • PHP language is must for modification
      • Operations like creating widget,removing a date field from theme and customize plugins require some understanding of PHP language.
    • CSS and HTML are must for graphics modification
      • If you want to change the look of home page of website,  CSS and HTML are must for modification.
    • Speed Issue
      • If we build website in WordPress, there are speed issues because WordPress websites contain lots of generic code unnecessary for every specific website.

3. What way to use WordPress

  • WordPress can be used in many different ways. It is open to possibilities. Our site is not a blog, it is more of a business resource website, and we are running it on WordPress. You can use WordPress as the following:
    • Arcade
    • Blog
    • Content Management System (CMS)
    • Gallery
    • Portfolio
    • Rating Website
    • Shopping Store
    • Video Collection Site
    • Membership Site

4. Compare  joomla and wordpress

  • The similarities:
    • It’s all content management system (CMS). CMS supports the creation and modification of  digital content. It is typically used to support multiple users working in a collaborative environment. CMS features vary widely. Most CMSs include  Web-based publishing, format management, history editing and  version control , indexing, search, and retrieval. By their nature, content management systems support the separation of content and presentation. A  web content management system  (WCM or WCMS) is a CMS designed to support the management of the content of Web pages. Most popular CMSs are also WCMSs. Web content includes text and embedded graphics, photo, video, audio, maps, and program code (e.g., for applications) that displays content or interacts with the user.
  • The Differences:
    • WordPress is user-friendlier than Joomla
    • WordPress is more flexible than Joomla.
    • SEO capabilities of WordPress are stronger than Joomla’s
    • Joomla provides better integration than WordPress
    • Joomla add-ons are easier to create than WordPress APIs
    • Managing everything on WordPress is simpler than Joomla
    • Beside, depend on different purposes, they are used popularly in different fields:
      • WordPress works especially well for  small to medium sized websites, blog and smaller e-commerce stores.
      • Joomla work great for e-commerce or social networking websites, but requires a basic understanding of technical skills.