Browsing Category

WordPress Tips

WordPress Plugins, WordPress Tips

How can users set avatar in WordPress

February 26, 2018

By default, WP does not allow directly uploading avatar image. So how can users use an image as their avatar?

There are two basic ways so users can set avatar themselves: Use Gravatar and Use a plugin.

  1. Use Gravatar

Gravatar is a service for providing globally unique avatars which be integrated into WordPress. In Dashboard > User area, you can see WordPress suggest you use Gravatar to change avatar.

To change your profile picture, go to https://en.gravatar.com/, sign in by WordPress account, then add your email and the image. The gravatar will be recognized where you use this email.

Moreover, Gravatar lets you add multiple emails.

  1. Use a plugin

Some membership plugins already have integrated uploading user avatar such as Indeed Ultimate Membership Pro, BuddyPress… So you do not need to find other plugins, maybe.

If you don’t like using Gravatar, no need to worry, there are a lot of plugins out there that can help you in this case. One of them is WP User Avatar plugin with interesting features such as:

  • Use image from Media Library as an avatar. This also mean uploading avatar just like uploading an image to Media Library by WordPress default.
  • Choose the avatar for the users who do not have a WP User Avatar image. You can choose showing user’s Gravatar or a default Avatar.
  • Support shortcodes to display or upload new avatar for users.
  • Allow Contributor and Subscriber upload their own avatar with the limitation of upload file size and image dimensions.

Besides, If you need further advanced features, you can consider to upgrade to WP User Avatar Pro version.

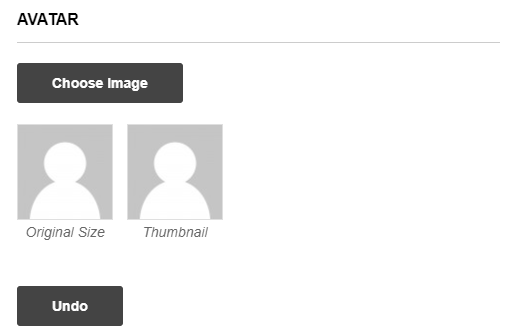
After installing WP User Avatar, you can see a section in User editor lets you change avatar.

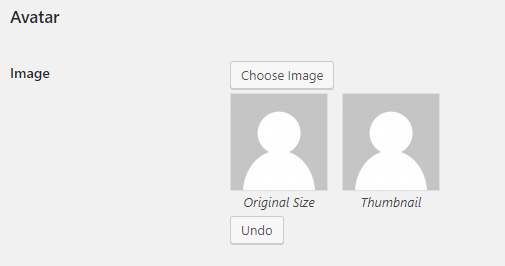
If user profile page is styled by Theme My Login, that section looks from front end like this:

WordPress Themes, WordPress Tips, WordPress Tutorials

Awesome things you can do with WordPress Widgets in 2017

December 18, 2017

As you know WordPress has released two versions of its adjustment in 2017: version 4.8 “Evans” and version 4.9 “Tipton”. Here are the great features that WordPress upgrades to Widgets:

The New Image Widget

WordPress 4.8 will introduce an image widget which will allow users to easily add images to the sidebar. You will be able to upload or select an image from the WordPress media library. Clicking on the select image will open the WordPress media uploader popup where users can upload or select an image. After inserting the image, users will be able to see a preview of the image in the widget area.

Wordpress Image Widget

The New Video Widget

Similar to the image widget, WordPress 4.8 will also introduce the Video widget. It will allow users to easily upload videos to their sidebar or display any video from YouTube, Vimeo, or any other Oembed provider.  Add the URL of the video you want to embed and then click on the ‘Add to widget’ button. The media uploader popup will disappear, and you will see a thumbnail preview of your video inside the widget.

Wordpress Video Widget


The New Audio Widget

Are you a podcaster, musician, or avid blogger? Adding a widget with your audio file has never been easier. Upload your audio file to the Media Library, go to the widget settings, select your file, and you’re ready for listeners. This would be an easy way to add a more personal welcome message, too!

The New Gallery Widget

WordPress 4.9 allows you to have a new Gallery widget to manage it your way. The functionality of gallery widget is as simple as it can get, just simply add images from your WordPress image library by using the Add Images button. You can also use this widget as a temporary way of making people intrigued on your social media platforms like Instagram and Pinterest by viewing thumbnails to create a collage of a single snapshot. So this new gallery widget feature in WordPress 4.9 will definitely create a lot of interest to more of your posts now.

Wordpress Gallery Widget

New and improved text widget

Like it or not, the current default text widget in WordPress is not the most useful thing for the regular user. It supports only raw text (or HTML code) and gives you no formatting tools at all. But the new text widget is set to change that with the inclusion of visual editor. Quite similarly, you will be able to switch between Visual and Text when editing widget content. And, yes, you get some standard formatting tools in both modes. I personally believe that this will finally make the text widget a usable tool for the non-code-savvy user who wants to include some custom content into a widget area. This is overall a great step towards putting the spotlight on the end user and their needs!

Previously, you need to have a basic knowledge of HTML and CSS to use media in Text Widget. With WordPress 4.9, you will have the “Add Media” button so you could insert images, videos, audio in the Text Widget easily.

Shortcodes in Text Widget

WordPress now parses shortcodes, and makes them work in a widget.


WordPress Tips

How to get Vimeo Client Identifier and Client Secret

November 7, 2017

Follow below steps to get your Vimeo Client Identifier and Client Secret:

Step 1: If you don’t have an account on Vimeo, self-create a new Vimeo account at https://vimeo.com/join

Vimeo Login

Step 2: Go to https://developer.vimeo.com/apps/ and login.

Vimeo Developer Dashboard

Step 3: If you have already created an app then follow the procedure from Step 5, else follow step 4 to create a new appVimeo Creat App

Step 4: Provide the required info, check I agree checkbox and click on Create App button.Vimeo Create App Fill Field

Step 5: Click on Authenticate tabVimeo Create App Authenticate

Step 6: Click on Generate Token buttonVimeo Generate Token

Step 7: Copy Client Identifier and Client Secret Vimeo Client Identifier and Client Secret


Well Done. You can use your Client Identifier and Client Secret in some WordPress Plugins use Vimeo API

WordPress Tips

How to Change Default Post Format in WordPress

November 1, 2017

What is WordPress Post Formats?

Since version 3.1, WordPress has a theme feature called Post Formats, which is a piece of meta information that can be used by a theme to customize its presentation of a post. Post formats is an optional value which would allows developers to define visual representation of a post.

WordPress has a total of 10 post formats, which are :

  • Standard – The default post format
  • Aside – A note like post, usually styled without title.
  • Gallery – A gallery of images.
  • Link – A link to another site.
  • Image – An image or photograph
  • Quote – A quotation.
  • Status – Twitter like short status update
  • Video – A post containing video
  • Audio – An audio file.
  • Chat – A chat transcript

However, not every theme supports all of these formats and some themes or plugins have features or template only for some specific post formats.

How to change default Post Format?

For example, VideoPro is a video-based WordPress theme, so it would use the Video post format mostly, then you will need to select Post format option everytime you want to add a new video post.

In fact, WordPress also give us a Setting to set default Post format for Post, which would save you a lot of time if you usually use another post format not Standard.

Just simply follow these steps (for more details, please find the screenshot below) :

  1. Go to Settings > Writing.
  2. In Writing Settings page, you will find Default Post Format section.
  3. Select the post format that you want to be default.
  4. Save Changes.

Then here you are, you will no longer need to select post format for posts every time you want to create one.

WordPress Tips

Debug on a live WordPress site

October 31, 2017

Debug is an indispensable part of Website Development as it helps developers detect bugs in most cases. If you are working on local and a test site, it doesn’t need to think twice to turn on the WordPress Debug Mode to check bugs.

However, when your website has launched already, displaying the error messages will annoy any visitors. It’s time to go with Debug Log and Debug Display. So, what’re they?

  • WP_DEBUG_DISPLAY will manage the display of error messages on all of your pages
  • WP_DEBUG_LOG can record all error messages to a debug.log file

That’s why we should use these statements in a conjunction to turn on debug without showing error messages on the site. Here we go.

Step 1:

Connect to your FTP or login to cPanel > File Manager and browse to your-wordpress-folder/wp-config.php file

Step 2:

Find this line of code “define(‘WP_DEBUG’, false);

Step 3:

Turn on the Debug Mode by changing the status from “false” to “true” and add these two statements:

define(‘WP_DEBUG_LOG’, true);
define(‘WP_DEBUG_DISPLAY’, false);

It will look something like this:

Step 4:

Don’t forget to save the changes, then go to the “wp-content/debug.log” file to discover the result.

It’s easy, right? Hopefully, this quick guide is helpful for not just developers but also ordinary users. Please feel free leave a comment if you have any feedback. And don’t forget to check out other blog posts for more interesting stuffs 😉

WordPress Tips

Turn on off WP DEBUG mode in WordPress

September 15, 2017

WordPress has a feature to DEBUG code (finding bugs) in developing environment. When this option is turned on, developers will see all notices and errors that come from the code. That’s great for deveoping themes and plugins.

However, when come to production environment, that option should be turned on. It’s because sometimes the notices or warnings are harmless to your site. You may install many plugins and many of theme do not care about notices or warnings. If the messages (of those notices and warnings) appear on the screen, users will feel uncomfortable. In some cases, those messages can break the site layout.

Thus, it is recommended to turn of DEBUG mode in live site. To do that, open /wp-config.php file (at the root folder of your site). You will see this line of code

define(‘WP_DEBUG’, false);

Change the value from true to false (and vice versa) to turn it off/on

define(‘WP_DEBUG’, true);

Remember to save the file. You can do this by using a file manager tool (often provided by your hosting) or a FTP app. The DEBUG mode will be handy if you see your site breaks in the middle of rendering the layout or you see a white/blank page. Turn it on, copy the message (of fatal errors) and send it to your technical supporters.

WordPress Tips

How to get higher Google PageSpeed grade over 90

September 6, 2017

To evaluate a website performance, people often use tools like Google PageSpeed Insights or Ping Dom. These online tools analyze your site content and give a grade based on various indexes such as Server Response Time, Optimize Images or Minify CSS.  A good grade is above 85 for Google PageSpeed and 90 for PingDom. Below are some tips to get higher score with Google PageSpeed (and consequently, Ping Dom)

  1. Server Response Time
    Server response time measures how long it takes to load the necessary HTML to begin rendering the page from your server, subtracting out the network latency between Google and your server. The only way to improve this index, is to upgrade your server. A stronger server will process faster and return results quicklier. Two components you should be aware of are CPUs and RAM. A SSD storage is even better (than normal HDD one). How many are enough? It depends on your site features. A shopping site is of course needs more CPUs than a personal blog. Try to upgrade your server until the response time goes below 1sOf course, make sure your theme and plugins code is optimized before looking for a stronger server. If you feel your site response is too long abnormally, it may come from the code itself. Try to disable theme and plugins one by one to detect the reason and switch to a better one.
  2. Minify HTML, CSS and HTML, enable Compression, Caching
    These indexes are quite easy to get high grade. Most caching plugins can do this for you automatically, such as W3 Total Cache or Super Cache plugin. Just install the plugins and turn on the cache & minify options, then you are ready to go.You can combine using Autoptimize plugin to minify HTML, CSS and HTML before caching. This plugin works very well with above two. One small note is that, sometimes there is a javascript file (or CSS, or HTML) which has improper piece of code. After minifying, the minified file breaks. As a result, the site doesn’t work. In one case, there is a missing ; (semicolon) at the end of the line so the minified lines is not valid anymore. You will need experience to detect the file having the issue, fix it, or ignore the file from minified files list.If you use a shared host (such as Google Daddy Managed WordPress), there is case that the caching setting doesn’t work. That’s because the caching module is not installed on your server. Readmore about this issue here. If you can, change the server.
  3. Prioritize visible content
    Google says: “If the amount of data required exceeds the initial congestion window (typically 14.6kB compressed), it will require additional round trips between your server and the user’s browser”. It is tricky. In many cases, you cannot do anything. It depends on your site design alot. It means the first 14.6kB compressed content of your site must be enough to render first page so visitors can see content quickly. So for example, if you leave a big image in the top of the page, browser will try to load the image instead of loading other text content. If  you use a lot of javascript to generate page layout, then visitors must way until all assets (image, javascript files) are downloaded before they can see anything. That will make “Prioritize visible content” index get a bad gradeTo improve this, there are 2 ways:
    • Structure your HTML to load the critical, above-the-fold content first. Don’t let your content and layout be mostly affected by javascript
    • Reduce the amount of data used by your resources, by compressing, minifying, or reduce number of images
  4. Optimize Images 

    This index is both easy and difficult. To get higher grade in this index, make sure your images are compressed (enough to look good on web) before uploading to your WordPress site. In addition, use proper image size (without resizing using CSS). For example, you should use 1280×900 px images in a place where it only needs 600x400px. That will give you bad grade in PageSpeed.That sounds easy? Yes. However, today we talk a lot about responsive website. It means the site must look good on mobile or smaller screens, at the same time page size must not be too big. On a responsive site, sometimes an image turn from 50% width into 100% width to adapt with new screen size. As a result, sometimes we need to prepare bigger image size than it actually needs. That will downgrade your PageSpeed scrore! A technical solution is to use responsive image (with srcset property). Basically you declare many sizes in a single place. When browser detects different screensizes, it will choose to load appropriate image sizes. Read more here. However, it’s not a perfect solution. When you resize your browser (on PC), there are cases at which the width does not match with any of previously declared values. Browser will still use small images at bigger places (or vice versa), thus images are stretched or shrinked making your site looks bad.

    Therefore, you will need exchange the responsiveness of your site with getting higher grade in this index. Re-design the layout in different screens so you can reduce number of image sizes needed. A great tip for you: focus on screen 1280px (HD screen), it is the size that Google PageSpeed grades your site.

    Well, one more good tip: if you already compress your images before uploading, but you still see warnings about a list of images which need to be compressed, don’t be panic. It’s because Google has a better compress algorithm than the tool you use. It thinks images can be compressed more. To overcome that, look for the link at the end of the result

    “Download optimized image, JavaScript, and CSS resources for this page.”

    Click on that link, you will be able to download optimizes resources that Google prepare for you. Re-upload images and you will get better result

Final words: although getting a higher grade at Google PageSpeed is a good thing, don’t let it fool you. There are many debates or dicussions saying that, the score doesn’t has any meaning. The only one that you need to focus is the loading speed and user experience. Anyway, the tool gives you indications to improve your sites, that’s great enough!

WordPress Tips

Visual Composer conflict with Skrollr lib of theme

May 21, 2017

If your theme uses Skrollr library, there is a chance that it will break the parallax effect of Visual Composer’ (VC) row element. The reason is that VC also uses Skrollr.  Because this library only inits once, when VC Row tries to init Skrollr, it returns the previous object inited by your theme (VC’s JS is loaded after your theme’s JS file).

In addition, VC row uses JS to add “data-” properties to parallax row, so the previous Skrollr object cannot detect these properties. As a result, VC parallax row does not work.

To fix this, you will need to trigger the Row Behavior function of VC again so Skrollr can understand “data-” properties of parallax row again

$(document).on(‘vc_js’, function(){
vc_rowBehaviour();
});

The “vc_js” event is trigger after all VC functions have been called.

Let me know if this solution works for you.