Browsing Category

WordPress Tips

WordPress Tips, WordPress Tutorials

CSS Gradient Border Colors

June 19, 2018

In the past, to create special borders like gradient we often use images.  Today, it becomes much cleaner with the use of CSS3 Gradient Border color. The method is by using CSS3 border-image property. The border-image property in CSS3 allows us to fill the border with an image as well as CSS3 Gradient. The browsers support for border-image are quite great; Chrome, Internet Explorer 11, Firefox, Safari, and Opera are all capable to fully render border-image. Following I have made a little example by applying CSS3 Gradient border color. Well, let’s see how the trick works.

HTML:

<div class=”c-boder”>

<p>Lorem Ipsum is simply dummy text of the printing and typesetting industry. Lorem Ipsum has been the industry’s standard dummy text ever since the 1500s</p>

</div>


<div class=”c-boder-1″>

Cactustheme

</div>


CSS:

.c-boder {

clear: both;

margin: 20px auto;

padding: 10px;

width: 200px;

height: 100px;

border-top: 3px solid black;

background-image: -webkit-gradient(linear, 0 0, 0 100%, from(#000), to(transparent));

background-image: -webkit-linear-gradient(#000, transparent);

background-image:-moz-linear-gradient(#000, transparent),-moz-linear-gradient(#000, transparent);

background-image:-o-linear-gradient(#000, transparent),-o-linear-gradient(#000, transparent);

background-image: linear-gradient(#000, transparent),linear-gradient(#000, transparent);

-moz-background-size: 3px 100%;

background-size: 3px 100%;

background-position: 0 0, 100% 0;

background-repeat: no-repeat;

}

.c-boder-1 {

font-size: 70px;

line-height: 170px;

margin: 50px auto;

font-weight: bold;

width: 450px;

padding: 20px;

text-align: center;

height: 250px;

color: #3ACFD5;

border-top: 20px solid #3ACFD5;

border-bottom: 20px solid #3a4ed5;

-webkit-box-sizing: border-box;

-moz-box-sizing: border-box;

box-sizing: border-box;

background-position: 0 0, 100% 0;

background-repeat: no-repeat;

-webkit-background-size: 20px 100%;

-moz-background-size: 20px 100%;

background-size: 20px 100%;

background-image: -webkit-linear-gradient(top, #3acfd5 0%, #3a4ed5 100%), -webkit-linear-gradient(top, #3acfd5 0%, #3a4ed5 100%);

background-image: -moz-linear-gradient(top, #3acfd5 0%, #3a4ed5 100%), -moz-linear-gradient(top, #3acfd5 0%, #3a4ed5 100%);

background-image: -o-linear-gradient(top, #3acfd5 0%, #3a4ed5 100%), -o-linear-gradient(top, #3acfd5 0%, #3a4ed5 100%);

background-image: linear-gradient(to bottom, #3acfd5 0%, #3a4ed5 100%), linear-gradient(to bottom, #3acfd5 0%, #3a4ed5 100%);

}

Link demo: https://jsfiddle.net/TrinhThang/mr9soh0u/10/

Note: The border-image will only work on rectangular shapes or boxes. That means adding border-radius will deviate the border-image output.

WordPress Tips, WordPress Tutorials

MySQL manipulation with WordPress

June 9, 2018

WordPress is the leading blogging platform. In the last decade or so, it has been adopted as a great platform for building dynamic websites. The reason for its increased popularity can be attributed to its huge community and user-friendly interface. One thing that most people don’t know is that this platform is PHP based and uses MySQL database as the backend database.

MySQL is a database management system that is used by WordPress to store and retrieve all your blog information. MySQL is an open source relational database management system. It runs as a server and allows multiple users to manage and create numerous databases.

This article will provide some important guidelines when manipulation your MySQL database manually for your website or blog with wordpress

WordPress provides a global object variable, $wpdb, which is an instantiation of the wpdb class defined in /wp-includes/wp-db.php. By default, $wpdb is instantiated to talk to the WordPress database. To access $wpdb in your WordPress PHP code, declare $wpdb as a global variable using the global keyword, or use the superglobal $GLOBALS in the following manner:

Example:

// 1st Method – Declaring $wpdb as global and using it to execute an SQL query statement that returns a PHP object

global $wpdb;
$results = $wpdb->get_results( "SELECT * FROM {$wpdb->prefix}options WHERE option_id = 1", OBJECT );

// 2nd Method – Utilizing the $GLOBALS superglobal. Does not require global keyword ( but may not be best practice )

$results = $GLOBALS['wpdb']->get_results( "SELECT * FROM {$wpdb->prefix}options WHERE option_id = 1", OBJECT );

Assuming that the table prefix is wp_:

$wpdb->posts will correspond to wp_posts table
$wpdb->postmeta will correspond to wp_postmeta table
$wpdb->users will correspond to wp_users table

INSERT ROWS

Insert a row into a table. This function returns false if the row could not be inserted. Otherwise, it returns the number of affected rows (which will always be 1).

$wpdb->insert( $table, $data, $format );

Parameters

table
(string) The name of the table to insert data into.
data
(array) Data to insert (in column => value pairs). Both $data columns and $data values should be “raw” (neither should be SQL escaped).
format
(array|string) (optional) An array of formats to be mapped to each of the values in $data. If string, that format will be used for all of the values in $data. If omitted, all values in $data will be treated as strings unless otherwise specified in wpdb::$field_types.

Examples

$wpdb->insert( 'table', array( 'column1' => 'value1', 'column2' => 123 ), array( '%s', '%d' ) );

UPDATE ROWS

Update a row in the table. Returns false if errors, or the number of rows affected if successful.

$wpdb->update( $table, $data, $where, $format = null, $where_format = null );

Parameters

table
(string) The name of the table to update.
data
(array) Data to update (in column => value pairs). Both $data columns and $data values should be “raw” (neither should be SQL escaped). This means that if you are using GET or POST data you may need to use stripslashes() to avoid slashes ending up in the database.
where
(array) A named array of WHERE clauses (in column => value pairs). Multiple clauses will be joined with ANDs. Both $where columns and $where values should be “raw”.
format
(array|string) (optional) An array of formats to be mapped to each of the values in $data. If string, that format will be used for all of the values in $data.
where_format
(array|string) (optional) An array of formats to be mapped to each of the values in $where. If string, that format will be used for all of the items in $where.
Possible format values: %s as string; %d as integer (whole number) and %f as float. (See below for more information.) If omitted, all values in $where will be treated as strings.

Examples

$wpdb->update( ‘table’, array(
‘column1’ => ‘value1’, // string
‘column2’ => ‘value2’ // integer (number)
),
array( ‘ID’ => 1 ),
array(
‘%s’, // value1
‘%d’ // value2
),
array( ‘%d’ )
);

DELETE ROWS

The delete function was added in WordPress 3.4.0, and can be used to delete rows from a table. It returns the number of rows updated, or false on error.

$wpdb->delete( $table, $where, $where_format = null );

Parameters

$table
(string) (required) Table name.
Default: None
$where
(array) (required) A named array of WHERE clauses (in column -> value pairs). Multiple clauses will be joined with ANDs. Both $where columns and $where values should be ‘raw’.
Default: None
$where_format
(string/array) (optional) An array of formats to be mapped to each of the values in $where. If a string, that format will be used for all of the items in $where. A format is one of ‘%d’, ‘%f’, ‘%s’ (integer, float, string; see below for more information). If omitted, all values in $where will be treated as strings unless otherwise specified in wpdb::$field_types.
Default: null

Examples
// Default usage.
$wpdb->delete( 'table', array( 'ID' => 1 ) );

// Using where formatting.
$wpdb->delete( 'table', array( 'ID' => 1 ), array( '%d' ) );


And to find out more about $wpdb, you can visit the following link: WordPress Codex

Finally, we hope the above information will help you work better MySQL with WordPress

Too see more awesome entry from Cactusthemes, please visit our Blog!

WordPress Tips

How to add Facebook Like button to WordPress site

June 8, 2018

Facebook is the most popular social network currently (2018) with 2.2 billion active users (according to statistic here: https://www.statista.com/statistics/272014/global-social-networks-ranked-by-number-of-users/

So if you are building a site, you would want to add Facebook Like button to your site. In this article, we will the give you the ways to do that on WordPress site

1. Manually configure the code

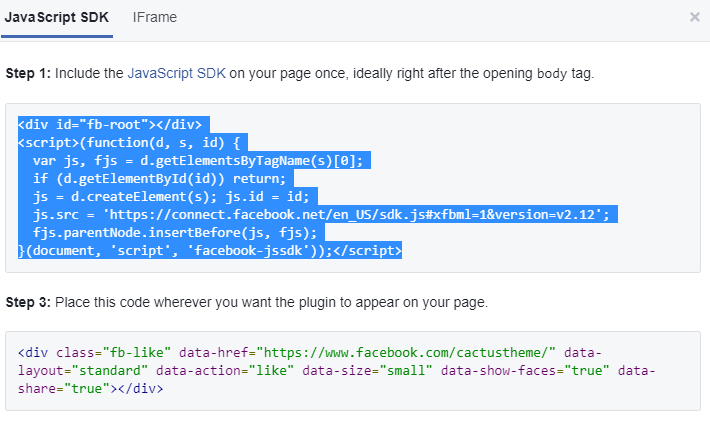
Step 1: Go to this link: https://developers.facebook.com/docs/plugins/like-button to configure your own Facebook Like button, then click on Get Code.

Step 2:  You can see the dialog box includes two code snippets.You would need to include the Javascript SDK on your site. If you are not familiar with WordPress files, you can use this plugin to add the code to your site easily. https://wordpress.org/plugins/insert-headers-and-footers/ . After instaling Insert Header and Footer plugin, navigate to Settings > Insert Header and Footer, paste the code to Header field.

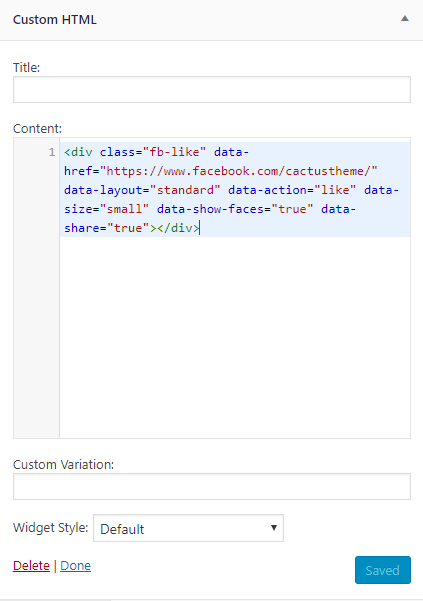
Step 3: Finally, copy the second code in the dialog box and paste to Custom HTML widget, then you can put this widget to the sidebar you want the Facebook Like button appeared such as Footer Sidebar. You will get the result as image below.

2. Using plugin

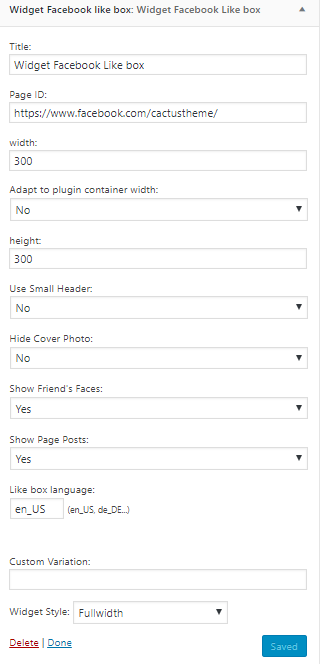
There are a lot of plugins allow you configure and insert Facebook Like button on your site. One of the simplest is Like Box Widget . After installing, go to Appearance > Widgets, you can see the new widget called Widget Facebook Like Box. Just put it to the sidebar you want to show the Facebook Like Box.

Hope this article helped you learn the ways to add Facebook Like button to your site.

WordPress Tips

How to make your site comply with Euro’s GDPR policy – Easy Steps

June 2, 2018

On 25 May 2018, the GDPR (European Union’s General Data Protection Regulation) officially takes effect.  In summary, if your site has user login/register features and is storing user data, and your site is serving EU’s users, you must provide a way for users to delete their own account & data.

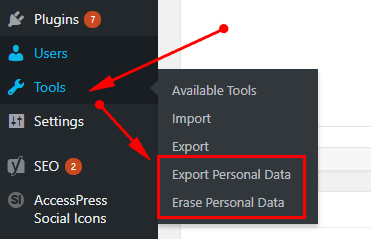
In WordPress 4.9.6, in back-end, there is a feature that allows logged-in users to do that. You will find two links in Tools > Export Personal Data and Erase Personal Data.

So, update your WordPress as soon as possible to prevent GDPR violation.

However, that link is only available in back-end and not every sites allow users to visite the admin panel. What should you do to allow users delete personal data from front-end? There is a simple way: using Delete Me Now plugin. The best thing is it’s free and easy to setup.

  • Step 1: Install and activate the plugin from Plugins > Add New > search for Delete Me Now
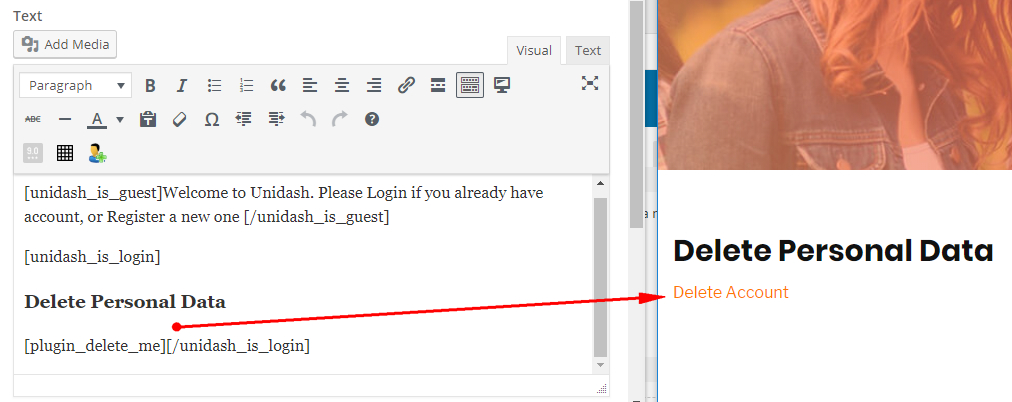
  • Step 2: Open any page that is accessible by logged-in users (if your site provide login/register feature, this page should be already available). Add this shortcode to the page content

[plugin_delete_me]

  • Step 3 (optional): If case you cannot find the page in step 2, use additional shortcode such as Conditional Tag Shortcode . The page content should be like this

[is_user_logged_in][plugin_delete_me][/is_user_logged_in]

That’s it. Now you are ready to meet GDPR’s requirements. Tell us what you think about this solution 🙂

WordPress Plugins, WordPress Tips

How to bulk delete thousands posts in WordPress

April 30, 2018

Have you been in a case which requires you to delete a ton of posts? If so, I won’t tell you about WordPress reset plugin because it will sweep out all of your site data, not only posts. There should be another way? Sure, let’s check it out my blog 😉

First, bulk deleting posts by default WordPress function

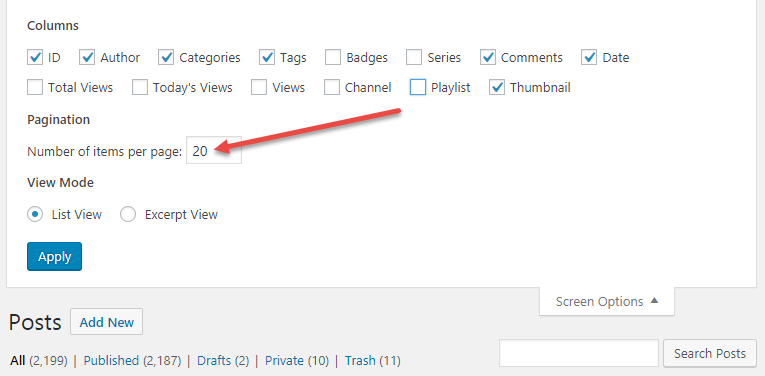
Currently, WordPress just display 20 posts per page in Dashboards > All Posts, which means you just can remove 20 posts at once. But you can increase this number easily by open Screen Options > Pagination: enter the Number of items per page as you need. Please note that the value must be less than or equal 999. However, I recommend you just enter the number less than or equal 99 to avoid an infinite page loading if your host is not powerful enough. And don’t forget to revert the posts pagination back to 20 when you’re done.

You can process the delete task more quickly, can’t you? Wait for a second, what’s about a thousand posts at one as I said before? Huh, you still need to do it better than that. Don’t be impatient. You will have the answer right now.

Second, using Bulk Delete plugin:

Actually, the plugin not only allows you to delete posts but also pages, attachments, users and meta fields in bulk based on different conditions and filters. In this example, I will focus on how to delete posts. Now, you can download the plugin at https://wordpress.org/plugins/bulk-delete/

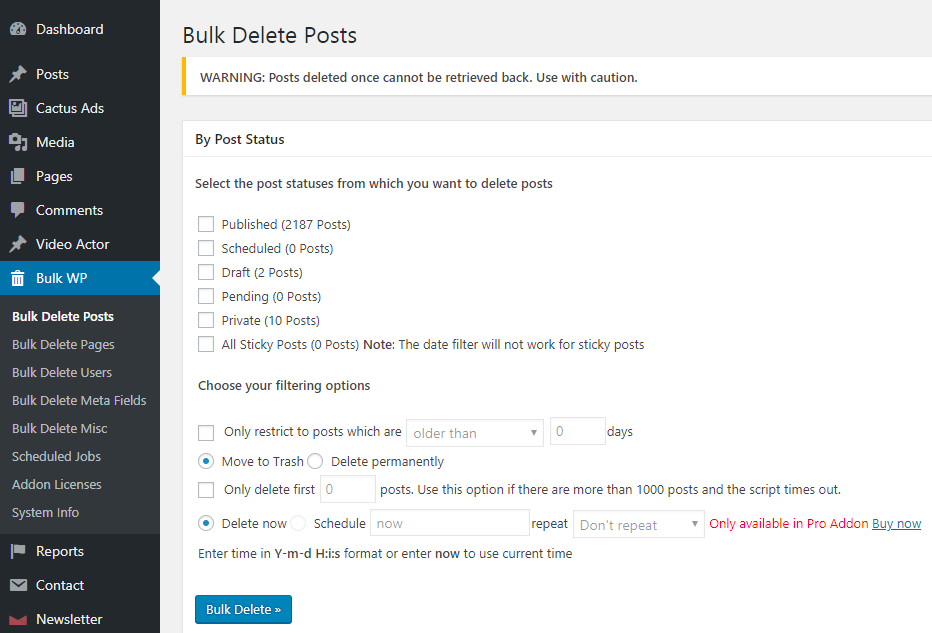
Once the plugin is installed and activated, a Bulk WP menu appears on the WordPress Dashboard. In Bulk Delete Posts, there are many conditions for you to chose how do you want to remove your posts:

  • Delete posts by category
  • Delete posts by tag
  • Delete posts by custom taxonomy
  • Delete posts by custom post type
  • Delete posts by url
  • Delete all draft posts
  • Delete all pending posts
  • Delete all private posts
  • Delete all scheduled posts

The plugin performance is excellent comparate to the traditional delete method of WordPress. I deleted more than 2 thousand posts within minutes. Ahh, don’t forget this warning: “Posts deleted once cannot be retrieved back. Use with caution.”

If you still need more than that. Please take a look at these features of Pro Add-on such as:

  • Delete posts by custom field
  • Delete posts by title
  • Delete posts by duplicate title
  • Delete all scheduled posts
  • Delete all posts from trash

Although the Plugin provides comprehensive options and filters to perform the bulk deletion. You even have one more choice to remove posts by using PHP MyAdmin and it’s indeed a high-speed process. However, since deleting posts in the database needs technical skills, it’s just recommended for advanced users & developers.


WordPress Plugins, WordPress Tips

How to show/hide content on specific pages?

April 20, 2018

WordPress provides Conditional Tags to control how a content is displayed on template files base on specific conditions. However, when we need to do this on dynamic content, we cannot use original Conditional Tags PHP code. Don’t worry, WP Conditional Shortcodes plugin will help you to accomplish this.

Download and Install

You can install and active WP Conditional Shortcodes directly in WP Admin Dashboard, or download the plugin package from here.

How to use it?

As you know, WordPress has many conditional tags, but this plugin only supports some basic conditionals tags which comes in shortcode format. Every shortcodes would includes its contents if the condition is true.

Here’s the list of supported shortcodes matches with its conditional.

  • is_single – if showing a single post. Use the optional parameter “ids” to specify specific posts.
  • is_singular – if showing a single post or page.
  • is_page – if showing a page. Use the optional parameter “ids” to specify specific pages.
  • is_home – if showing the blog home.
  • is_front_page – if showing the front page of the site.
  • is_sticky – if the current post or page is ‘sticky’.
  • is_category – if showing a category-based archive. Use the optional parameter “ids” to specify specific categories.
  • is_page – if showing a page.
  • is_tag – if showing a tag-based archive.
  • is_tax – if showing a tag- or category-based archive.
  • is_author – if showing an author-based archive.
  • is_archive – if showing any archive.
  • is_year – if showing a yearly archive.
  • is_month – if showing a monthly archive.
  • is_day – if showing a daily archive.
  • is_time – if showing an hourly or shorter archive.
  • is_feed – if generating a feed.
  • is_search – if showing search results.
  • comments_open – if comments are open for the current post or page.

Especially, with  is_page, is_category and is_single shortcodes, you also can use ids=”” attribute to list of the ids that you want to apply the condition.

For example :

[is_page ids="76, 339"]hello[/is_page]

[is_category ids="5, 7"]hello[/is_page]

[is_single ids="94, 63"]hello[/is_single]

In the reverse, you can use prefix not_ before the shortcode name to negative the condition and use it as a if else condition with the positive condition.

[is_single]
This is only shown if showing just this post.
[not_single]
This is shown everywhere else.
[/is_single]
WordPress Plugins, WordPress Tips

Simple Way To Get Free SSL Certificates (HTTPS) For Your Website

March 28, 2018

Google finally released the official SSL Certificates (https) for website with custom domain how I can get it ? just follow this tutorial.

Using plugin: Really Simple SSL 

Description

Really Simple SSL automatically detects your settings and configures your website to run over https.
To keep it lightweight, the options are kept to a minimum. The entire site will move to SSL.

THREE SIMPLE STEPS FOR SETUP:

  • Get an SSL certificate (can’t do that for you, sorry).
  • Activate this plugin
  • Enable SSL with one click

Screenshot:


Congrats! Now your website has a unique SSL certificate which will surely enhance an extra layer of security to your website. Now check your website with https:// and enjoy free SSL.

I hope you like this in-depth guide/tutorial, and I’m sure that this tutorial will help you take your blogger blog to the next level and it will improve your ranking in all search engines. If you’ve got any problem or you’ve stuck on any step then feel free to ask in comments, and if you appreciate this post then, please do share this post to let more people know about this trick, after all, sharing is caring.

If you have any question, feel free to comment on the comment section down below.

Wordpress Developer, WordPress Plugins, WordPress Tips

How to use URL field in Visual Composer

February 28, 2018

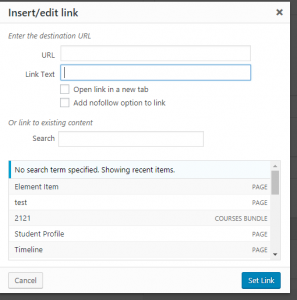
URL field of Visual Composer is “vc_link” param type. The user can use this field to search and add a link of post/page… link exactly and easy. Besides, that user can type link directly like another text field. Moreover, the user can add target attribute equal “_blank” to open link in a new tab and add rel attribute equal “nofollow” for SEO campaign.
Url Field Setting

1. Add the URL field to your custom element

Visual Composer already has an URL field and we only need to add it to custom code.

2. Manage and edit the HTML

3. Result and Complete Code